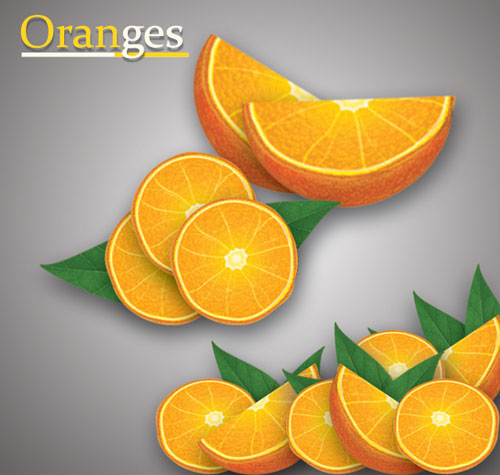

In this step-by-step Illustrator tutorial, you will learn how to make a photo realistic vector orange using Adobe Illustrator CS3. We will cover lots of Illustrator effects like sponge, plastic wrap and accent edges. A very good Illustrator training tutorial for beginners on drawing fruits.
Let’s start by creating a circle, use the ellipse tool or press “L” on your keyboard. It doesn’t have to be a perfect round shape, but one that suits for the shape of an orange would suffice. Set the Line Color to “None” and the Fill color to Brass Radial 7. Edit
the Colors of the Brass Radial 7 by clicking on the edit/apply color icon.

Duplicate Layer 1 by dragging it to the New layer button on you Layer Palette.

Rename it to “Orange” by double clicking on the layer, and then change its fill color to black.

We are doing this so we can apply all effects on this layer then change its layer opacity to achieve the look of an orange.

Apply Sponge Effect to the Layer “Orange”. Go to Effect> Artistic> Sponge….

Apply Plastic Wrap effect to the same layer. Go to Effect> Artistic> Plastic Wrap…

Now change the opacity of layer “Orange” to Soft Light 100%. Make sure that the layer with the Sponge and Plastic Wrap effects is on top of “Layer 1” and that layer “Orange” is selected.

After changing layer “Orange” opacity it should then look something like this.

Now let’s start doing the skin of the orange. Create a new layer, rename this layer to “skin” and use the Pen tool to draw around the orange core. Again this doesn’t have to be a perfect circle. Change the Fill color to none and the Line color to FBB040 and the Stroke to 10 pt.

Apply Sponge Effect. Go to Effect> Artistic> Sponge…

Apply Plastic Wrap. Go to Effect> Artistic> Plastic Wrap…

Apply Accented Edges. Go to Effect> Brush Stroke> Accented Edges…

Feather it to 2pt. Go to Effect> Stylize> Feather…

Then it should look something like this.

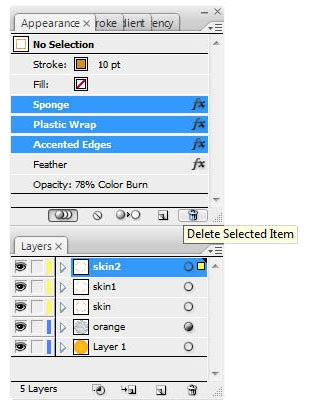
The good thing about Illustrator is that all the effects that you applied to a layer can be change. All of the information of a certain layer are saved and can be edited on the Appearance Palette, like its fill color, line color, effects etc. To show your Appearance Palette go to Window>Appearance or press Shift+F6 on your keyboard. Duplicate the layer “Skin” and rename it to “Skin1”.
Duplicate the layer “Skin” and rename it to “Skin1”

Scale it down to 99%


Change the layer opacity option to Color Burn 78%.

Go to Appearance window and change its line color to D08F25. Edit the feather effect and change it to 4.

It’s should now look something like this.

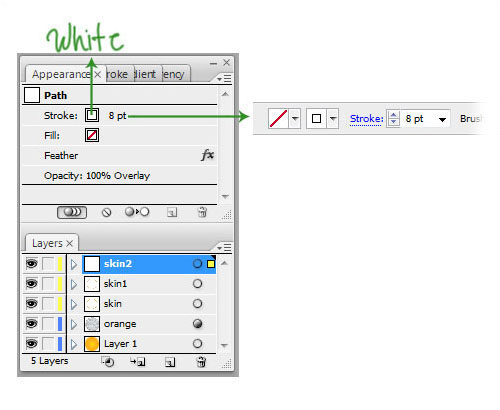
Duplicate the layer “Skin1” and rename it to “Skin2” scale it down to 98%. Go to Appearance Palette, Delete the Sponge Effect, Plastic Wrap Effect and Accented Edges Effect.
Change its line color to White, Stroke size to 8 pt and change the Feather to 3 pt. Also change the opacity to Overlay 100%.
Again it should look something like this.

This is the final step for the process in creating the skin of the orange. Duplicate the layer “Skin2” and rename it to “Skin3” scale it down to 96%. Go to Appearance Palette and change its line Stroke size to 4pt, Feather to 1 pt and change its opacity to Lighten 60%.

Create a new layer and name it “inside”. Using the Brush tool draw a shape similar to this. Set the line to none and the fill to white and change the layer opacity to Normal 80%.

Duplicate the layer “inside” and name it “inside2” change the Fill to Gold Radial and change its opacity to Hard Light 47%.

Scale it down to 75%…

Let’s add more details by drawing lines inside our orange Create a new layer and name it “lines”. Again use the brush tool and set its stroke thickness to 2 pt.

Go to Effect> Blur> Gaussian Blur and blur it by 5 pixel. Apply Accented Edges, go to Effect> Brush Stroke> Accented Edges…

Duplicate the layer “lines” and rename it “lines2”. Change the opacity to Screen 41%.

Now let’s rotate the lines, to rotate the lines make sure that the Direct Selection tool is selected, point the anchor to the lines edges and press Ctrl on your keyboard and rotate it.

We will now add more details by drawing some droplets to the orange use the brush tool and draw some droplets of water. Set the fill color to “Cyan Radial 3” and the line color to none. Go to Effect> Stylize> Drop Shadow. Set the opacity to lighten 55%.

Now your orange is done. Just play with your creativity and add more slices. Also to increase its color, rasterize all the Layers, Duplicate it then change the duplicated layer opacity to Multiply 25%.

Wow it looks so realistic. I ill try it out myself.
Thanks Greg.
This is really exciting stuff. Thanks buddy.
amazing work there.
but many of the comments are confusing, and not clear
Awesome tutorial!!! THANKS!
Attempting your Oranges tutorial – but in Step #1 – WHERE do we find or get the color for the fill of “Brass Radial 7”?
Thank you!
It’s a great tutorial undoubtedly, but I had a problem with the gradients u used. I’m usin’ illustrator CS4, could this be the problem??
gread job!
This is fantastic! It was very thorough and not hard to do! (Though I had trouble finding the right filters and such, because I’m german and using the german CS3, of course. So that’s not your fault!)
Nicely done! =D
Excellent tutorial!
thanks..
Gracias esta bastante bien esplicado y es un trabajo escelente
Thanks for sharing idea.
oh , good job , I like this tut , thanks man
Wow that’s awesome. I’m more of a photoshop user, but tutorials like this make me want to get to know Illustrator better. Great job! I’m gonna try this.
-Cheers
Its so nice! You r greate
great work.thanks for your ideas.
This tutorials are very nice and very useful to me. I learn a lot with these tutorials, thank you very much…. thanks
thanx, this is awesome for people who are teaching themselves to animate and draw.
Hi
This is great work…………
I really enjoyed reading this article. I’m actually committing Sin #2 ‘Waiting too long to comment’! However, I felt compelled to express appreciation, since I think many of these you enumerate are unconscious mistakes that can easily be rectified.
only fault eat flavor magnific didactic tutorial.Enaldro