
Follow this tutorial and learn how to draw a strawberry dropped into a chocolate milk using Adobe Illustrator. The tutorial is composed of three main parts: creating the chocolate ripples, the chocolate splash and the strawberry. You will start with the basic shapes and with the few techniques involving the Offset Path, Pathfinder and Transform effects, you can easily create the shapes that you need. The Mesh Tool also plays an important role in this tutorial along with several effects such as Gaussian Blur, and Feather. This artwork is enjoying to create so let’s get started!
Difficulty: Easy
Requirements: Adobe Illustrator
What will you get?
- Instant download of PDF e-book (23 pages, 40 steps)
- Comes with Ai file for easy reference
- Detailed step by step tutorial to draw a nice realistic strawberry chocolate milk splash
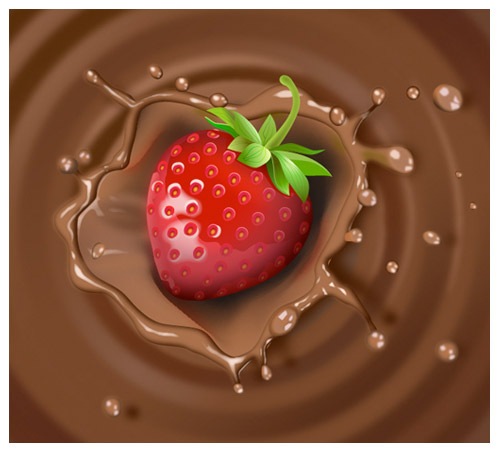
Tutorial Preview:
Create the Strawberry
23. With the help of the Pen Tool (P), draw an object similar below and fill this object with R=80, G=0, B=0. Keep the resulting shape selected, go to the Object > Path > Offset Path. Follow the data as shown in the second image and then click OK. Replace the existing color of the newly created shape with R=128, G=14, B=35 and then apply a 5px Gaussian Blur effect for it. Next, move the result 4px up and then 7px to the left.


24. Reselect the new shape created in the previous step and go to the Object > Path > Offset Path. Follow the data as shown below and then click OK. Replace the existing color of the newly created shape with R=238, G=44, B=56 and then apply a 10px Gaussian Blur effect for it. Next, move the result 10px down and then 8px to the left. Now select the bigger shape created in step 23, duplicate and bring it to front (Ctrl +Shift +Right Square Bracket). Make sure that the duplicate is still selected, hold down the Shift key, click on the shape added with the Gaussian Blur effect in this step and then go to the Object > Clipping Mask > Make (Ctrl +7).


25. Using the Pen Tool (P), create an object as you can see in the image below. Once your object is drawn, fill it with the radial gradient. Next, open the Transparency palette (Window > Transparency) and set the Blending Mode of the newly created shape to Multiply.


26. Continue working with the Pen Tool (P), create two objects as shown below and fill
them with R=255, G=125, B=119. Next, set the Blending Mode of the resulting
shapes to Overlay. Finally, press (Ctrl +Left Square Bracket) twice to get the result
as shown below.

27. We'll create the seed of the strawberry. With the help of the Ellipse Tool (L), create a 16px by 18px object. Pick the Direct Selection Tool (A) and use this tool to increase the length of both the handles of the top anchor point of the newly created object and then reduce the length of both the handles of the bottom anchor point. After you are done adjusting the shape of the new object, reselect it and fill it with the radial gradient.

28. Select the shape created in step 27 and go to the Object > Transform > Scale. In
the Scale dialog box, select the Non-Uniform, enter a 45 in the Horizontal box and
enter a 65 in the Vertical box, then click Copy. Replace the existing color of the new
shape with the new radial gradient.

29. To add some details for the seed, draw a curved path as shown below. Fill this path with
none, add a 2px stroke (R=255, G=130, B=130) and apply the Width Profile 1 for
the result. Here, we have the seed ready. The last thing to do is select the three newly
created objects, group them (Ctrl +G) and name this group “pink_seed”. Now we’ll
create another seed by making a duplicate of the newly created group. Replace the
existing color of the curved path of the duplicate with R=255, G=0, B=19. Finally,
name the newly created group “red_seed”. />

... end of preview. Sign up for premium membership to read the whole tutorial!

