
Follow this tutorial and learn how to create a barbecue text effect in adobe illustrator. For starters you will learn how to create a grill with live coals using some gradients along with some basic effects and Transparency palette. Next, using a bunch of new shapes, some simple effects and basic masking techniques you will learn how to create three letters with different styles. Finally, you will learn how to add subtle shading using a simple Drop Shadow effect and the masking techniques. Let’s get started!
Difficulty: Easy
Requirements: Adobe Illustrator
What will you get?
- Instant download of PDF e-book (32 pages, 28 steps)
- Comes with Ai file for easy reference
- Detailed step by step tutorial to draw a nice realistic barbecue and grill food image
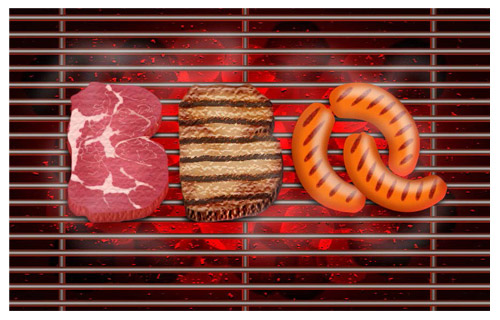
Tutorial Preview:
Place the BBQ Elements into the Grill
25. Place the "B_Raw", the "B_Grilled" and the "Q_Sausage" group to the positions as shown below.

26. Select the "B_Raw", the "B_Grilled" and the "Q_Sausage" group, then make a copy (Ctrl +C, Ctrl +F) of them. Next group (Ctrl +G) these copies and then go to the Effect > Stylize > Drop Shadow… Follow the data as shown in the first image and click OK. Now select the group "Grill" created in the step 7 and make a copy of it, then bring the copy to front. Replace the existing stroke color of the new group with yellow, then open the Pathfinder palette and click on the Unite button. Keep the resulting shape selected, hold down the Shift and click on the group with shadow effect applied in this step, then go to the Object > Clipping Mask > Make (Ctrl +7). Next hide this clipping set behind the "B_Raw", the "B_Grilled" and the "Q_Sausage" group.


27. At this point your artwork should look like in the next image:

Create the Smoke
28. With the help of the Pencil Tool (N) create some curved paths as shown below. Once
your paths are drawn, reselect them and add a 15px stroke (R=255, G=255, B=255),
then apply the Width Profile 2 for the resulting paths. Finally apply a 15px Gaussian
Blur for the resulting paths then set them to Blending Mode Screen and reduce the
Opacity to 50%.


Here is what the completed design looks like. Hope you enjoy it. Have a nice day.

... end of preview. Sign up for premium membership to read the whole tutorial!

