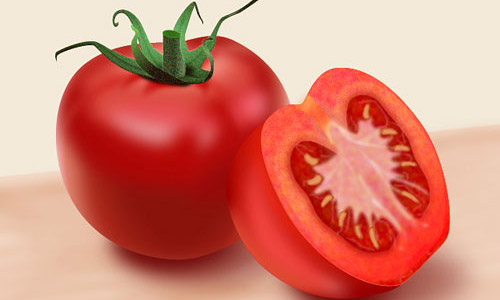
In this tutorial you will learn how to create realistic and detailed tomatoes in adobe illustrator. For starters, you will use basic tools (Pen, Ellipse tools) to create the main shapes that you need. Next, you’ll see how you can add depth and shading for your shapes using complex gradients, the Appearance palette and some effects (Gaussian Blur, Grain…). Let’s start!
Create a new document
1. Press (Ctrl +N) to create a new document. Select Pixels from the Units drop-down menu, enter 766 in the width box and enter 678 in the height box then click on the Advanced button. Select RGB, Screen (72ppi) and make sure that the Align New Objects to Pixel Grid box is unchecked before you click OK.

2. Start with drawing the following path using the Pen Tool (P). Once your path is drawn, fiil it with the radial gradient.

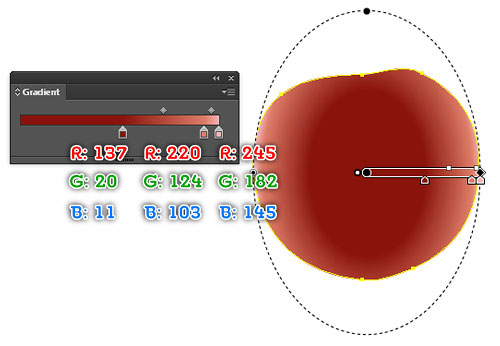
3. Keep working with the Pen Tool (P). Use this tool to create a green path and then fill it with the radial gradient as shown below. Next apply a 10px Gaussian Blur for the result. Continue to use the Pen Tool (P) to create the following paths, fill them and then apply the Gaussian Blur effect for the results. Now select and group (Ctrl +G) all shapes created in this step. Then select the shape created in the step 2, duplicate (Ctrl +C, Ctrl +F) it once and then bring the copy to front (Ctrl +Shift +Right Square Bracket). Keep the copy selected, hold down the Shift, click on the newly created group and go to the Object > Clipping Mask > Make (Ctrl +7).

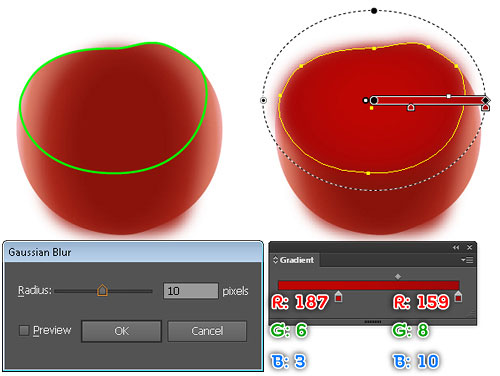
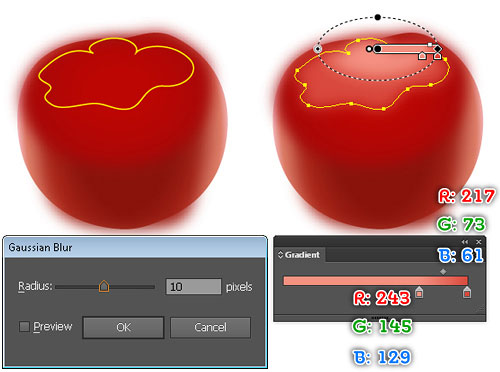

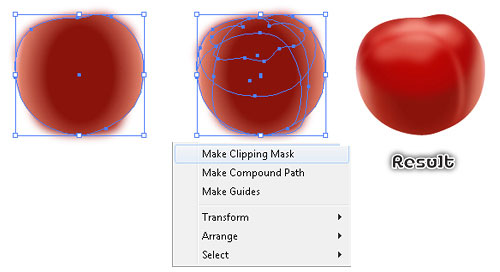
4. It’s time to add the highlights to the surface of the tomato. First draw two following paths. Once your paths are drawn, fill them with the linear gradient as shown below. Finally apply a 10px Gaussian Blur for the results.

Create the stem of the tomato
5. We’ll draw the leaves first. With the Pen Tool (P) draw a following path. Next fill this path with the radial gradient as shown in the second image. Reselect the newly created shape, duplicate (Ctrl +C, Ctrl +F) it once and then move the copy 2px up. Next replace the existing color of the newly created shape with new radial gradient.

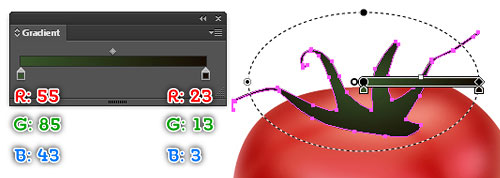
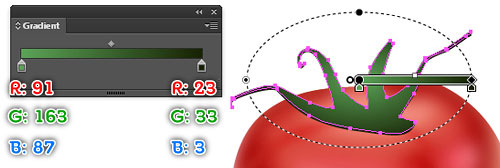
6. Continue to draw more leaves until you have something like this.

7. Select all shapes created from beginning step 5 to this time and go to the Object > Path > Offset Path…Enter a 1px Offset and then click OK. While the results selected, go to the Effect > Texture > Grain…Follow the data as shown below and then click OK. Finally set the Blending Mode of the resutls to Screen and reduce the Opacity to 50%.

8. Pick the Pen Tool (P), draw five paths and then set the data for these paths as shown below. Next apply a 1px Gaussian Blur for the results.

Create the central branch
9. Draw a path and then fill it with the linear gradient. Reselect the result and go to the Object > Path > Offsect Path…Enter a 1px Offset and then click OK. While the newly created shape selected, go to the Effect > Texture > Grain…Follow the data as shown in the third image below and then click OK. Finally set the Blending Mode to Screen and reduce the Opacity to 60%.
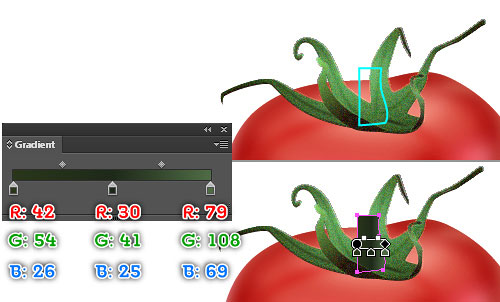

10. It’s time to reate the cut section of the branch. Start with drawing an ellipse using the Ellipse Tool (L). Next fill this ellipse with the radial gradient.

11. Continue create another ellipse, fill it with the linear gradient and apply a 3px Gaussian Blur for the result. Next hide the newly created shape behind the branch.

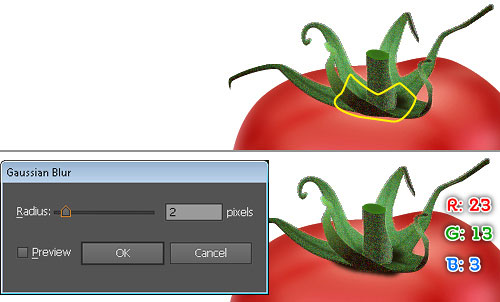
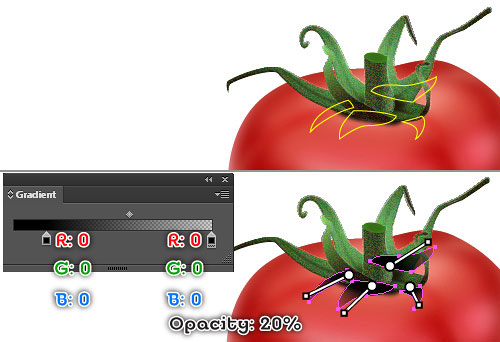
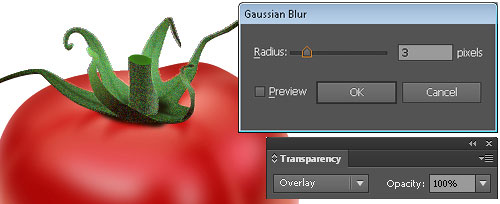
12. Let’s create shadow from the leaves. First draw a path with the help of the Pen Tool (P). Once your path is drawn, fill it with R=23, G=13, B=3. Apply a 2px Gaussian Blur for the result and then hide it behind the stem. Next draw four other paths and then repeat the same process as the previous steps to create more shadows. Finally hide them behind the stem also. You should end up with something like the final image below.

Create half a tomato
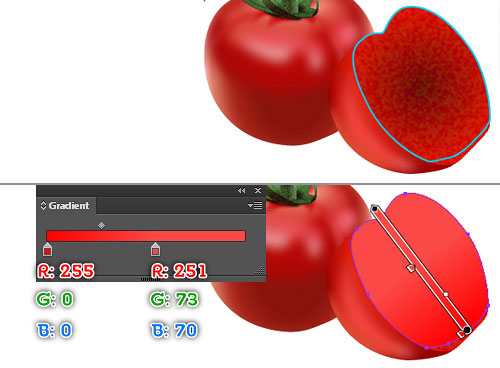
13. Use the Pen Tool (P) to create two paths as shown below. Once your paths are drawn, fill the blue path with the radial gradient.
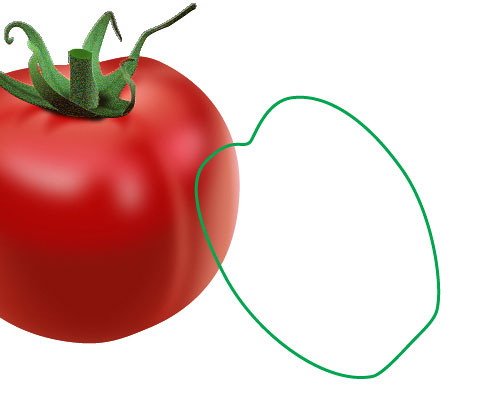
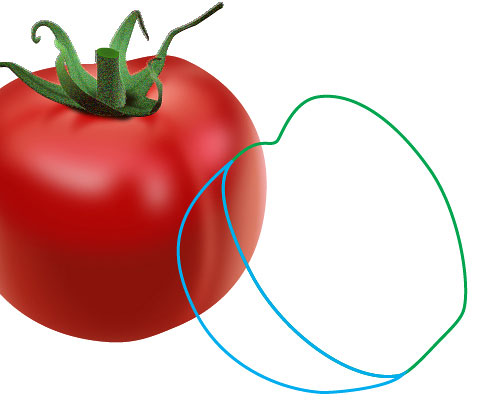

14. Continue create other paths, fill them and then apply the Gaussian Blur effect for the results as shown in the images below.
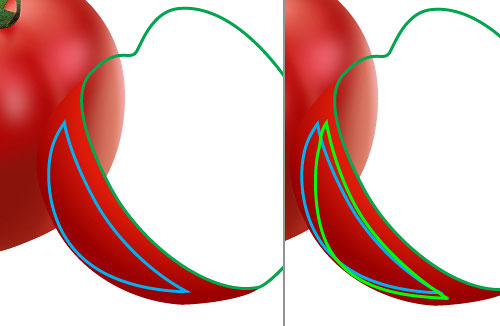
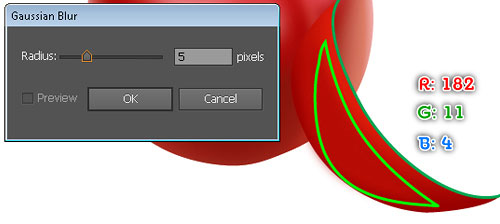


15. Select and group (Ctrl +G) three newly created shapes. Next select the shape created in the step 13, duplicate it once and then bring the copy to front (Ctrl +Shift +Right Square Bracket). Keep the newly created shape selected, hold down the Shift, click on the newly created group and go to the Object > Clipping Mask > Make (Ctrl +7).


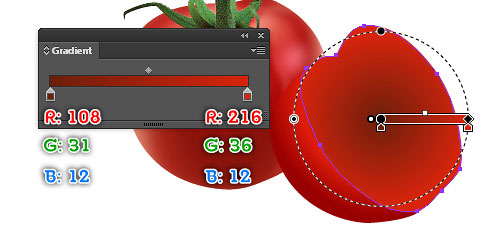
16. Fill the green path with the radial gradient. Reselect the result and make a copy of it. Replace the existing color of the copy with new radial gradient. Keep the result selected, go to the Effect > Texture > Grain…Follow the data as shown below and then click OK. Finally set the Blending Mode to Darken.

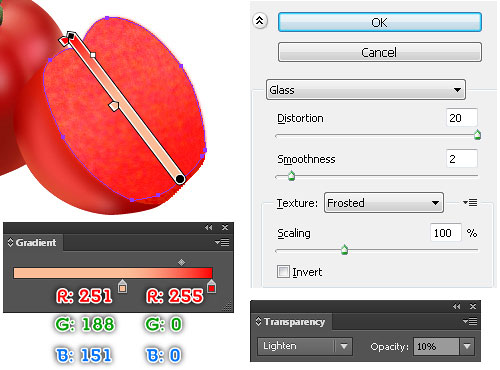
17. Create a blue path and then fill it with the linear gradient as shown below. Reselect the result and go to the Effect > Texture > Grain…Follow the data as shown below and then click OK. Next apply a 2px Gaussian Blur for the result. Reselect the newly created shape, duplicate it once and then replace the existing color of the copy with new linear gradient. Make sure that the newly created shape is still selected, open the Appearance palette (Window > Appearance) and remove the Grain effect. Next go to the Effect > Distort > Glass…Follow the data as shown below and then click OK. Finally change the Blending Mode to Lighten and lower the Opacity to 10%.

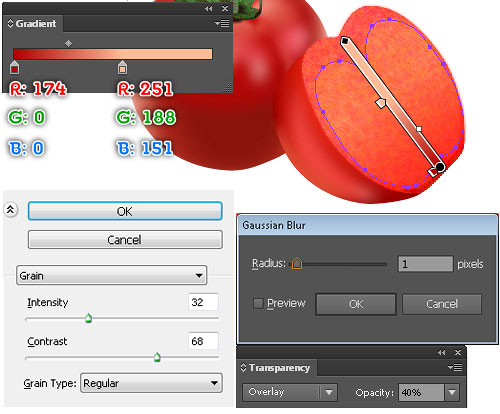
18. Create a yellow path and then set the values like you see in the images below. Next reselect the result, duplicate it once and then press (Ctrl +Left Square Bracket) twice to send the copy backward. Reselect the original shape and then reset the values like you see in the third image.

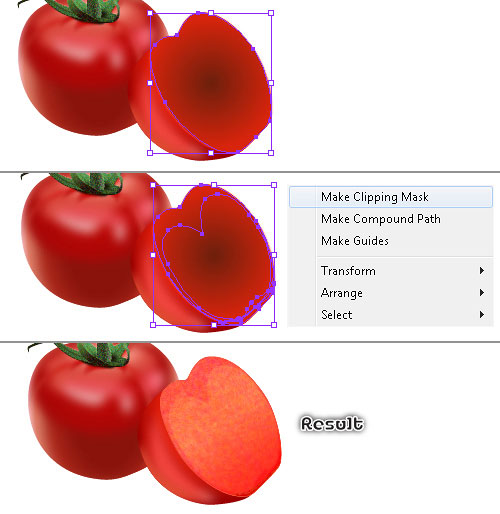
19. Select and group (Ctrl +G) all added effects shapes created from beginning step 16 to this time. Now select the remaining shape created in the step 16, duplicate it twice and then bring the copies to front. Next hide a copy (Ctrl +3). Reselect the remaining copy, hold down the Shift, click on the newly created group and go to the Object > Clipping Mask > Make (Ctrl +7).
20. Press (Ctrl +Alt +3) to show the shape hidden in the previous step. While the shape selected, remove the fill color and add a 1px stroke as shown below.
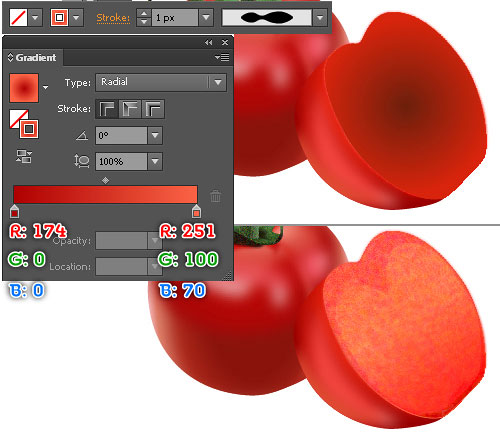
21. Use the Pen Tool (P) to create a yellow path as shown below. Once your path is drawn, duplicate it once and then hide the copy. Reselect the original path, fill it with the radial gradient and then make a copy of the resulting shape. While the copy selected, replace the existing color of it with new radial gradient and go to the Effect > Texture > Grain…Follow the data as shown below and then click OK.
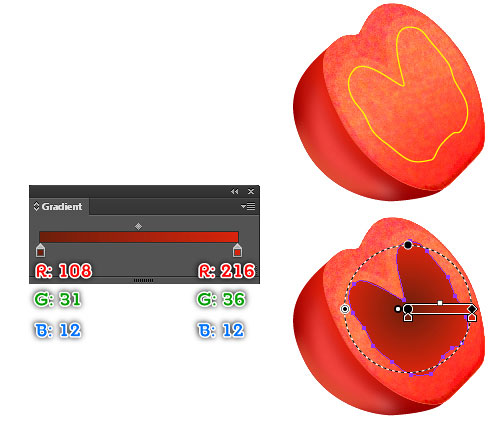
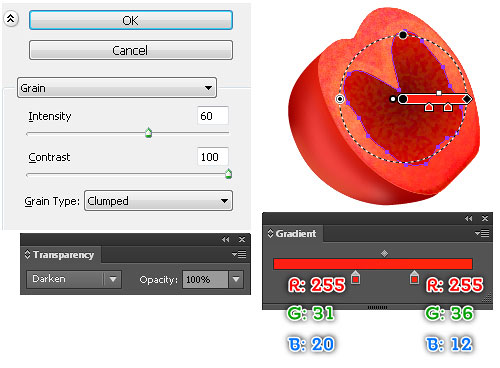
22. Show the path hidden in the previous step and bring it to front. Fill this path with none and add a 7px stroke as shown below. Next apply a 4px Gaussian Blur then set it to Blending Mode Hard Light and reduce the Opacity to 80%.
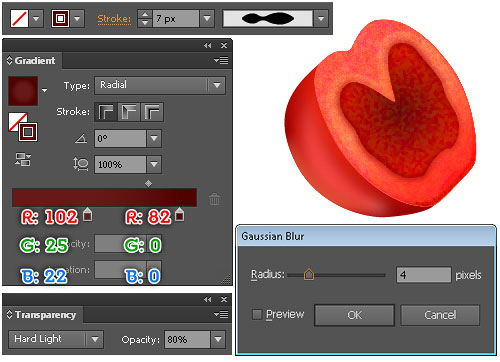
23. Create a yellow path and fill it with the linear gradient. While the resulting shape selected, go to the Effect > Texture > Grain…Follow the data as shown below and then click OK. Next apply a 2px Gaussian Blur for the resulting shape. Likewise,continue create other paths then follow the sequence of images and repeat the same process as the previous steps.
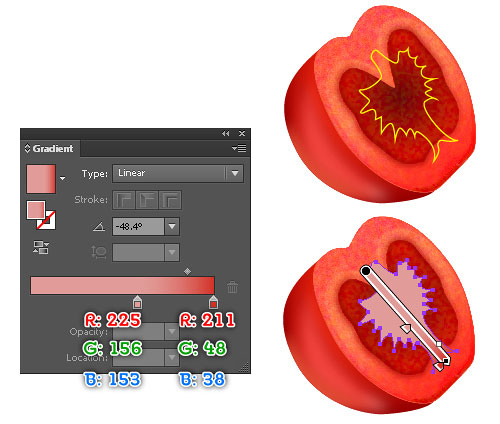
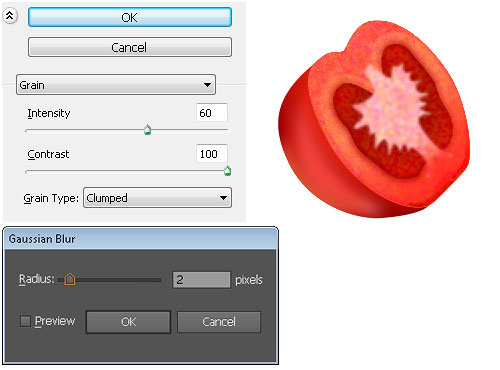
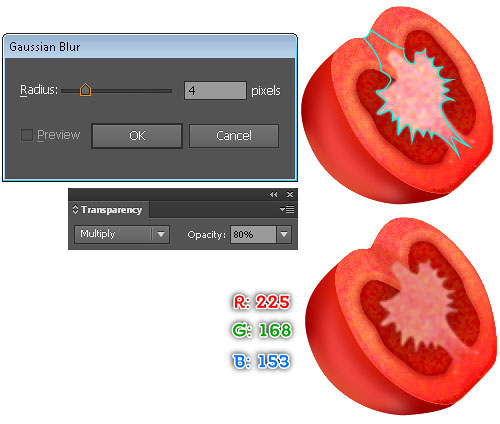

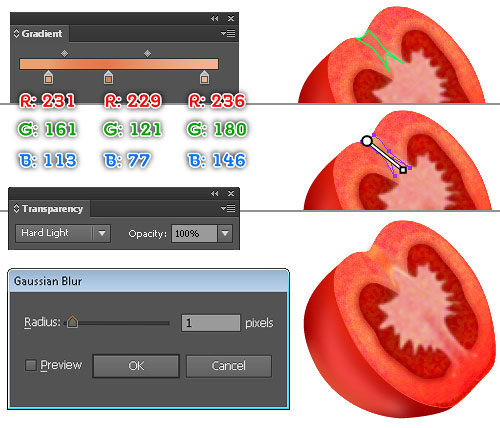
24. To add some details, first draw paths as shown below. Next fill them with none and add a 1px stroke (apply the linear gradient within stroke). Finally apply a 2px Gaussian Blur for the results.
Create the seed for the tomato
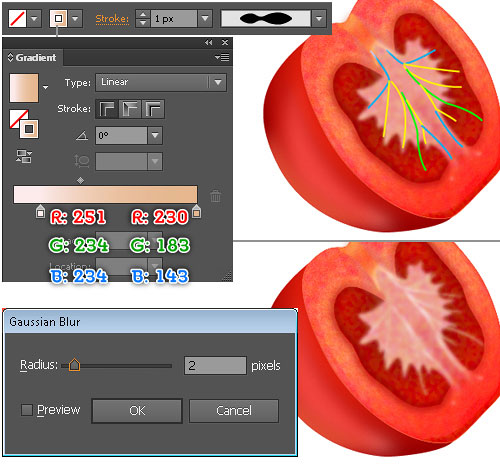
25. First draw two paths as shown below. Once your paths are drawn, fill the bigger path with R=179, G=70, B=16. Next fill the remaining path with R=231, G=150, B=95 and then apply a 1px Gaussian Blur for the result. Select and group two newly created shapes. Here we have the seed ready. Likewise, repeat the same process as the previous steps to draw more seed. (Ambien) Finally place the seed to the positions as shown in the final image.


26. To add some details, first draw paths as shown below. Next fill them with none and add a 1px stroke (R=237, G=114, B=118). Finally apply a 2px Gaussian Blur for the results. Now select and group (Ctrl +G) all shapes created from beginning step 13 to this time. In the end your artwork should look roughly like the final image.


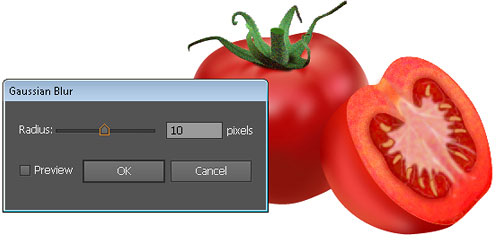
27. Create an elliptical path and then rotate it as shown below. Fill this elliptical path with the radial gradient. Next apply a 10px Gaussian Blur for the resulting shape. Finally hide it behind the “half a tomato” group.

Create the background
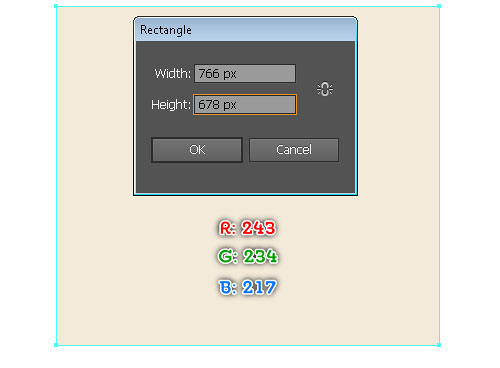
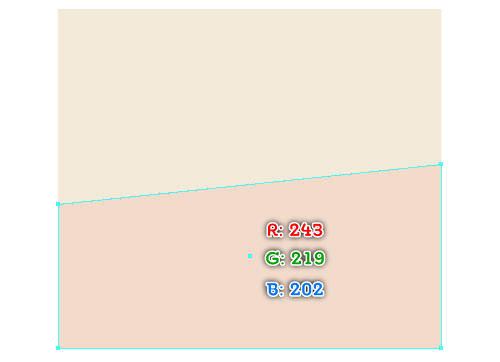
28. Pick the Rectangle Tool (M) and then use this tool to create a 766 by 678px shape. Next fill it with R=243, G=234, B=217. Continue create another shape and then fill it with R=243, G=219, B=202.
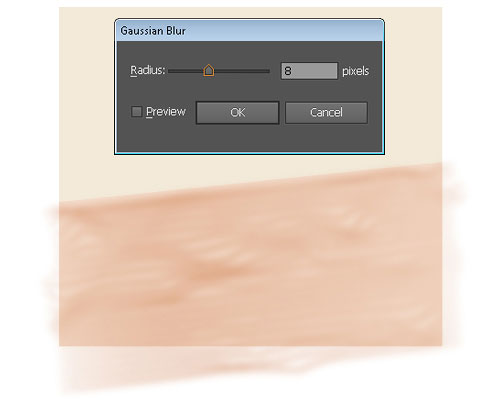
29. Create the straight paths as shown below. Next fiil them with none and add a 3px stroke (R=194, G=95, B=37). Now pick the Warp Tool and then use this tool to brush through the row of lines in a horizontal direction. You should end up with something like you see in the second image below. Finally apply a 8px Gaussian Blur for the newly created objects.


Create the shadows for the potatoes
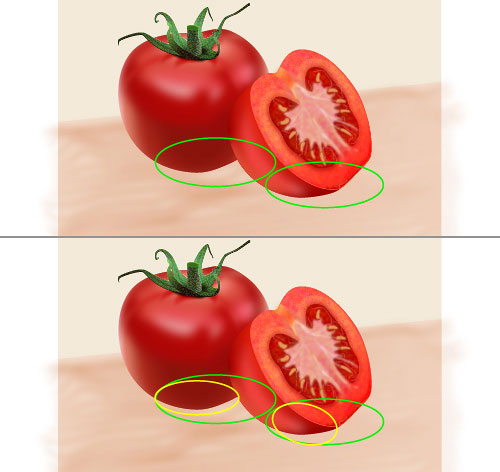
30. Place the potatoes to the position as shown below. Next pick the Ellipse Tool (L) and use this tool to create four ellipses as shown below. Fill these ellipses with the radial gradient and then add the Gaussian Blur effect for the results. Finally hide them behind the potatoes.



Here is what the completed design looks like

To download the source file for this tutorial, you will need to login as a member.
Sign up today to access all exclusive members content!
