
Filmora is a simple but powerful video editor for Mac and PC that is targeted at the enthusiast and prosumer markets. It’s ideal for a variety of basic tasks, such as creating instructional videos, editing action camera footage, and creating viral videos for social media sites.
You probably wouldn’t use it to edit a feature-length film, but for short video work, it’s surprisingly powerful for the price, with a nice mix of features that are simple to use.
The software has been around for a while and was originally released as Wondershare Video Editor, but it was rebranded as Filmora after version 5.1.1. Because of this long history, Wondershare has been able to iron out almost all bugs and user interface problems, though some of the newer features need a little more work until they are completely reliable.
Features of Wondershare Filmora
The app has a plethora of features, and while we don’t have space to discuss them all, we’ll focus on the key points that make it worth your time.
Its interface is based on the idea that “all tools are in front of you.” It will appeal to a large number of beginners who dislike traditional video editing software packages with complex tool layouts.
1. Very Simple Interface

The design and workflow of Filmora are among the easiest to grasp of any video editing software. On the main interface, you can access all resources and features, such as adding text and transitions, applying filters, and exporting clips.
Filmora Pro can be learned in a matter of minutes, while other programs can take hours to master.
2. Various Video Editing Modes
When you first start Filmora, you are given four entry points to four editing modes, the names of which signify the program’s focus: Action Cam, Full Feature, Instant Cutter, and Easy Mode.

Unfortunately, you cannot change modes once you have entered one. The app must be restarted. For example, Action Cam mode includes all of the tools required for this genre in three modules: Fix, Speed, and Color.
3. Filters of Various Types

You can add as many filters as you want to Filmora Wondershare. Pick the filters or overlays that you want to apply to your project by clicking on the “Effects” tab in the media library.
Hover your mouse over the effect you want to use. Click on the plus sign in the middle when you see it. The effect would then be applied to the timeline.
Take note: If you are editing a “portrait” clip (9:16) in a 16: 9 video format, you can replace the black bars with background blur filters.
All of the filters and overlays in this video editing app are organized by subject category (for example, Faux Film or Bokeh Blurs), making it easy to find them. Navigate to the “Effects” menu, then to the left side of the screen to see the categories and begin watching.
4. Import Features
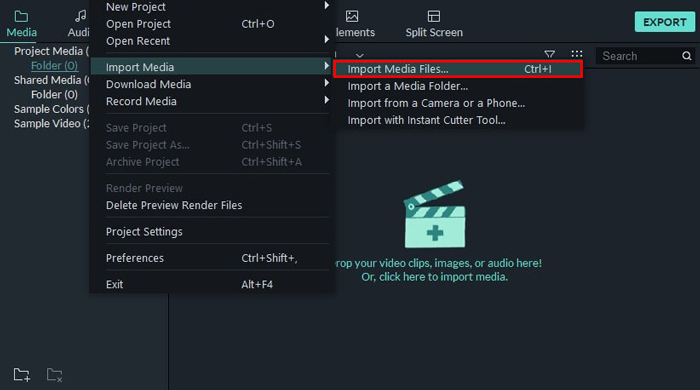
Filmora supports the import of standard, HD, and even 4K images. Your media clips, including imported videos, images, and audio files, will be stored in the media library, where you can access them quickly and conveniently without having to create unnecessary folders, etc.
5. Recording Videos
This video editing program allows you to record videos from your webcam or PC screen. You can also record your own voice over it. The video file will be added to the library automatically, and you can simply drag it onto your timeline.
6. Extended Color Grading

After you’ve dragged the video onto the timeline, press the “Color Palette” icon to open the “Advanced Color Adjustment” window. Many free templates are available under the Preset” tab, including 3D LUT, Vignette, Shared, Movie, Custom, and Favorites. Simply double-click on the necessary template to add it to the video.
- White Balance: This setting allows you to adjust the color temperature. You can set a warm color by moving the light slider to the yellow side, or a cool color by moving the light slider to the blue side.
- 3D LUT: color correction presets are usually used as part of the digital intermediate process while creating movies.
- Color: in this section, you can adjust the exposure, brightness, contrast, saturation, and shine.
- Light: here you can adjust the lighting of the video by changing the basic settings, namely glare, shadows, BW.
- HSL: refers to hue, saturation, and brightness, which are used to optimize the individual color range of your clip.
8. Artificial Background Blur
If you want to focus on one part of the clip while blurring the others, use the Tilt-Shift feature. The Mosaic choice allows users to blur specific parts of the video and change the percentage ratio that induces an increase or decrease in the portion of the video where the blur is applied.
9. Audio Equalizer

The audio equalizer function helps you to tailor the sound to achieve the ideal mix of audio. As a result, the various instruments and voices would sound fantastic together.
Open the Audio Inspector window by double-clicking on the audio in the timeline to configure the equalizer. Then, in the “Equalizer” tab, choose from the following options: default, pop, rock and roll, soft, classic, low bass, lively, western, techno, hard rock, acoustic, folk, blues.
You may also use the “Customize” button to change the settings.
10. Audio and Text Synchronization
Users can lower the volume of the section of the video that displays the text and effects. You can not only add words, but also add beautiful animation and effects to them. Many users compare Filmora’s captioning algorithm to Lightworks’ video editing software.
11. Split Screen
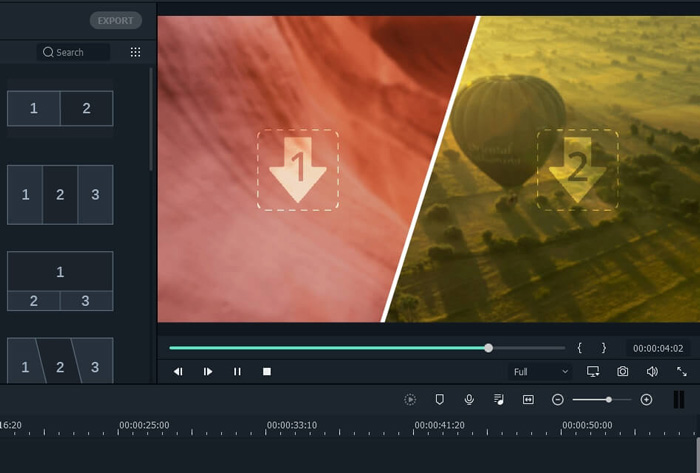
You can use this feature to create videos that contain several clips and frames that are shown in the same video at the same time. To do this, click the split screen button on the left.
Then you’ll see the split screen settings, where you can choose how many screens you need and where they should be placed.
Price of Filmora Video Editor
Its trial version only allows you to export documented material ten times, and the software attaches the Filmora logo to exported projects automatically. If you want to operate without watermarks, consider the following prices, which vary depending on the operating system:
MacOS:
Windows:
You can buy a full license without having to pay every month. Students can also qualify for a discount.
Wrapping Up
Filmora is a versatile video editing software that is ideal for users who want to concentrate on their imagination rather than the technical aspects of video production. Its careful combination of an easy-to-use interface and advanced features makes it a good value for novice and intermediate content creators, but more seasoned users would prefer a solution that provides more flexibility and customization in the editing process.