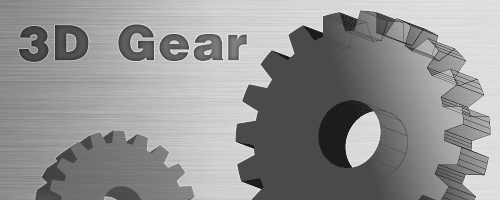
I will be showing you how to draw a 3d gear easily in this Illustrator tutorial. To make things more interesting, I will be using opacity mask to show through the wireframe of the gear. After this tutorial you will have a better understanding on drawing gears and 3D extrude tool in Adobe Illustrator.
1. Create the gear shape
Let’s star by turning on our Ruler by pressing Ctrl/Command+R. Drag 2 lines from the ruler to crate a center point. Now select you Circle Tool and press Alt/Option+Shift and drag from the center point to draw a circle.

Select the Star Tool. Click and drag front the center point to create a basic star. Without releasing your mouse, press Arrow Up key to increase the number of points. Hold Ctrl/Command and drag to adjust the radius until you get the shape below. Now select the circle and star shape and go to Window>Pathfinder and hold Alt/Option and click Add to shape area. This will create a sun flare effect as shown below.


Draw a new circle from the center point. This will define the outer edge of our gear. Now select both the sun flare and our circle and hold Alt/Option and select Intersect shape area.

Finally, draw a small circle in the middle. Next select both shapes and hold Alt/Option and choose Subtract from shape area to punch a hole in the middle. Our gear shape is finally out!

2. 3D Extrude
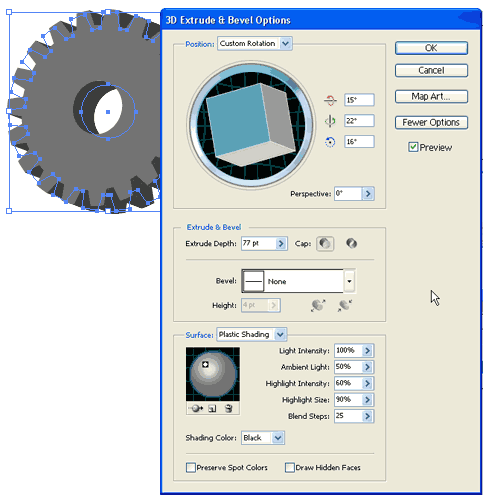
Select your gear shape and go Effect>3D>Extrude & Bevel. Select Plastic Shading for the Surface and move the spotlight on the sphere until you see something you like. (Grossmancapraroplasticsurgery) Click OK to confirm.

3. Create the wireframe effect
Make a duplicate of the 3D gear shape by pressing Ctrl/Command+C and Ctrl/Command+F to paste it in front. Go to layers palette and hide the new pasted gear. Select the gear and go Window>Appearance to open up your Appearance Palette. Double click 3D Extrude & Bevel to edit the options. Now select Wireframe for Surface.


Now unhide our grey gear from the Layers Palette. Next draw a square and fill it with a gradient from white to black with our Gradient Tool. The black will mask away the shape whereas the white areas will show through. Now select both the grey gear and the gradient and open up your Transparency Palette. Choose Make Opacity Mask to fade away the black areas.

This is our final gear. To make changes to the mask, select the gradient mask in the Transparency Palette. Then go to the gear and click and drag to change gradient angle.

To download the source file for this tutorial, you will need to login as a member.
Sign up today to access all exclusive members content!


Really nice work…Thanks!
Simple and nice. Good. Thanks.
It’s so nice. Thanks
Great Tutorial, thx for the class……….Lou
Very useful and easy to follow. Thanks.
its very easy to learn
This is a great tutorial! Thanks for sharing!
nice tutorial!!! thank you so much..
Good Work.I like your siquance..
This was a great quick way to draw gears… just what I needed. Thanks a lot!
Thank you for your very easy to follow directions!
Very good application of the opacity mask, nice tutorial
Thanks
Brilliant tutorial. Thankyou for sharing your knowledge with us.
Super. I try to learn without any book and this is quite difficult.
Nice effect with the gradient on the end. Thanks!
Quero parabenizá-los pelo site, está me ajudando muito.
Abração!! Gd.
Amazing tutorial, easy to follow, thank you very much for the hard work.
Muchas gracias….
THIS ROCKED! THANK YOU THANK YOU!
thank you so much.. haven’t learned anything new in illustrator for a while… this was great 🙂
Nice effect with the gradient on the end. Thanks
very special tut. Thanks
Great Great Great Tutorials. Thanks you so much.
Very simple techniques ! Thanx for sharing
Thank you for the tutorial! Great use of pathfinder!