
Illustrator Blend Tool does the trick of creating smooth transition between objects. You can blend open paths to create line effects and blend shapes to create realistic shadings. There are many creative things you can do with the Blend Tool and you will definitely be using it a lot in your illustrations.
Blend Effects
Here are some quick interesting stuff you can do with blending.
Realistic Shadings
With smooth blends you can create realistic shading which cannot be done with gradient.

Line Effects
You can create nice abstract blending line waves using Blend Tool. This is done by blending a dark to a light blue line.

Distributing Objects
With blend tools you can quickly align objects with specified steps.

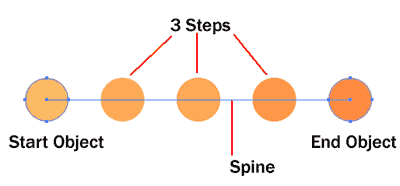
Understanding How Blend Works
This is a quick diagram of how a blend looks. A blend needs at least 2 objects to blend. The start object will blend to the end object with the amount of steps you specified for the blend. In this case, I set it to 3 steps. A spine will also be automatically created. This spine determines the path the in between objects take.
Blending Objects
Method 1: Using Blend Function
To quickly make a quick smooth blend. Select the 2 objects you want to blend and go Object>Blend>Make. A smooth blend with be created.

To read the whole article, you will need to login as a member.
Sign up today to access all exclusive members content!

Next Lesson: Photorealism with Gradient Mesh »
Back to Illustrator Training Course
Loved this lesson, so many neat things illustator can do, thanks again for showing me how to blend
I think I’ve done something wrong with my settings– when I used “blend–>make” the object goes from dark to white instead of what you’re example shows. The star example gave me three deformed stars in between my start and end points.
Hi LadyUranus, make sure the 2 objects are same shape. Then blend using Blend>Make. Alt/Option click on the blend to change settings to see how you can edit the blend options.
Cool tutorial, i make jamaica flag blend into a spliff
Keep the fill for both circles with the desired color. Change the stroke to None, box with red line through it, for both circles. Then try using the blend> make!
Nice tutorial. Thank you so much.
Thanks for this. Very much appreciated.
Love and very funny this lesson.Thanks for good tips.You are cool.
Derek is right. You have to remove strokes or its colours would eb the ones blending!!!!
Awesome tutorial
What I am not able to do though is to distribute objects keeping the size. The shapes in the middle are always smaller and bigger than the starting and end ones.
Same here…how do you keep the size of the object consistent? Also having a little trouble with the line effects…how is it done?
ok, so, under Method 2: Using the blend tool, I follow directions, blend options window pops-up, I click 3 and OK, and nothing happens. Is it supposed to have 5 stars like in illustration, or is it simply supposed to blend color of the first star? Mine doesn’t seem to do anything? I can’t seem to find where the spine is- mine only has one object. Thanks for the help.
Real brain power on dsplaiy. Thanks for that answer!
出,我按3和确定,并没有任何反应。它应该是有像插图5星,或者是简单的,它应ghjfjfj
This tuto is one of the best (until now) 🙂