

In the following steps, you will learn how to create a cordless drill in Adobe Illustrator. For starters, we’ll be using basic tools (Pen Tool (P), Ellipse Tool (L), Rounded Rectangle Tool…) and some techniques (Offset Path, Blend, Clipping Mask…). Moving on, you will learn how to cleverly use the Gaussian Blur effects and how to add depth to your shapes using complex gradients or blending options. So let’s get started!
Difficulty: Intermediate
Requirements: Adobe Illustrator
What will you get?
- Instant download of PDF e-book (55 pages, 130 steps)
- Comes with Ai file for easy reference
- Detailed step by step tutorial to draw a nice cordless drill
Tutorial Preview:
64. Pick the Pen Tool (P) and use it to draw objects. Fill them with the linear gradient.

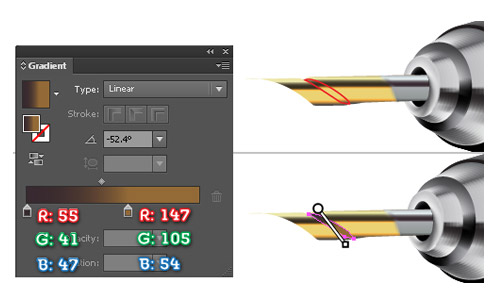
65. Create a curve and set the values like you see in the image below.

66. Use the Pen Tool (P) to draw an object. Reselect the object, pick the Eyedropper Tool (I) and click on the object highlighted with the brown arrow in the second image.

67. Continue to create objects and set the values as shown below.

68. Duplicate (Ctrl +C, Ctrl +F) the objects selected and move the copy 40px to the left. Adjust the copy a little to get the result as shown in the third image below.
69. Create the two objects as shown below.

70. Reselect the two newly created objects and go to Object > Blend > Blend Options. Enter the data as shown below and click OK. Go to Object > Blend > Make (Ctrl +Alt +B). Finally, send the result to back (Ctrl +Shift +Left Square Bracket).

... end of preview. Sign up for premium membership to read the whole tutorial!

