
In the following tutorial, I’ll show you how to create a very realistic and detailed camera using Adobe Illustrator. We’ll be creating the base shapes using the Basic Shapes and the Pathfinder. Next, we will add the details using gradients and the Appearance Panel. Finally, we will use effects like: 3D Extrude & Bevel, Blur, Warp, Texture to create a vivid camera. Let’s start!
Difficulty: Intermediate
Requirements: Adobe Illustrator
What will you get?
- Instant download of PDF e-book (70 pages, 214 steps)
- Comes with Ai file for easy reference
- Detailed step by step tutorial to draw a nice photorealistic dslr camera
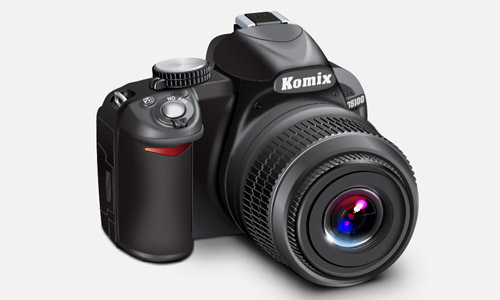
Tutorial Preview:
207. Use the Pen Tool (P) to create an object as shown in the image below.

208. Fill the newly created object with R=0, G=0, B=0. Next, add the Gaussian Blur effect for the object. Finally, send the result to back (Ctrl +Shift +Left Square Bracket).

209. Continue to use the Pen Tool (P) to create an object as shown in the image below.

210. Fill the newly created object with R=35, G=31, B=32. Next, add the Gaussian Blur effect for the object. Finally, send the result to back (Ctrl +Shift +Left Square Bracket).

211. Continue to use the Pen Tool (P) to create an object as shown in the image below.

212. Fill the newly created object with the linear gradient. Next, add the Gaussian Blur effect for the object.

213. Here’s how it should look like. I hope you’ve enjoyed this tutorial and be able to apply these techniques in your future projects.

... end of preview. Sign up for premium membership to read the whole tutorial!

