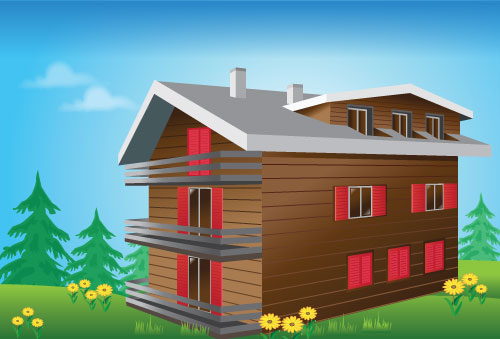

In this tutorial, we will create a cozy looking wooden house surrounded by greenery and bright yellow wild flowers.
We will build the house step by step using basic drawing tools and simple techniques. Then we will create the background with the bright blue sky, the meadow and the conifer trees. In the end, we will enhance the surroundings by creating the grass patches and bright yellow wildflowers.
So let’s start building our house!
Drawing the House
Our house is made up of four main parts – the wooden walls, the roof, 3 balconies and doors and windows. We will begin by building the walls which is the basic structure of our house.
The Walls
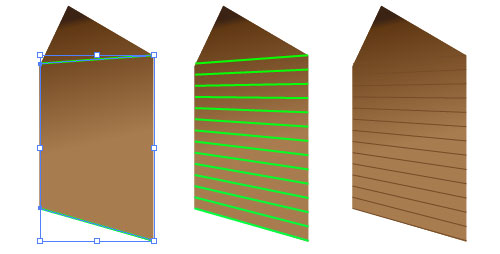
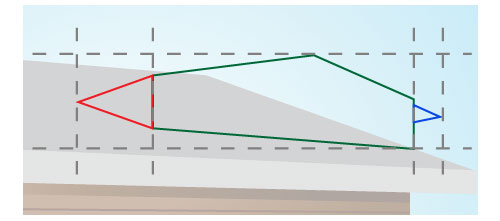
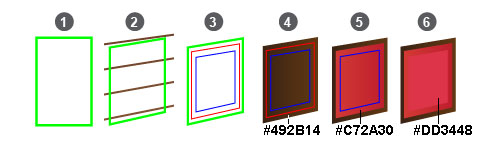
1. Create a new document in Illustrator with width 2800px and height 1900px. This will give us ample space to create the entire scene. Draw two separate shapes with the Pen tool (P) for the two walls as shown. I have drawn the dotted grey lines just for reference. The furthest end of each wall will be narrower because of perspective. Make sure the vertical lines of the walls are parallel to each other.

2. As the walls are made of wood we will color them in shades of brown. Select each wall individually and with the Gradient tool (G) fill gradients as shown.
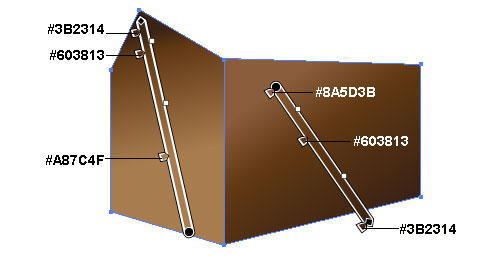
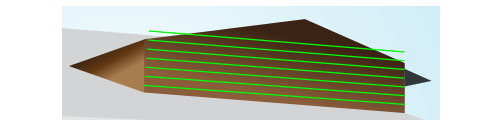
3. For the lines on the wall, draw two lines with the Line Segment tool (\) at the top and bottom of the wall as shown below (green lines). Keep the line weight 5pts and line color # 471A0F. I have used green lines for ease of explaining. We are going to use blend to create the lines in between. For this, first specify appropriate options for the blend. Go to Object > Blend > Blend Options and enter values in the dialogue box as shown. Click OK.
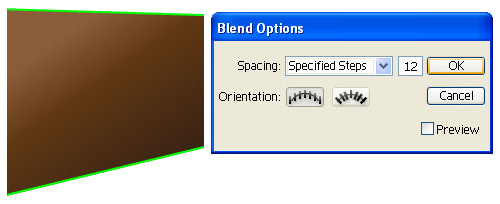
4. Now select both the lines and go to Object > Blend > Make. The lines will blend in 12 steps to create our desired effect. Your result should look something like this but with brown lines.

5. We will repeat the same process for the smaller wall now. As the upper part of this wall is very narrow we will have to use 2 separate line blends for the top and bottom part of the wall. For the bottom part draw two lines as shown with line weight 5pts and line color # 754C28. Select both lines and go to Object > Blend > Make. The lines will blend in 12 steps. Illustrator uses the same blend options you specified the last time you have used blend.
6. For the top part of the wall we need lesser lines, so we will specify only 2 blend steps. Draw two lines as shown, keep the same line weight as before and make the line color # 3B2314. Click OK. Our walls are ready!

The Roof
7. The roof of the house is made of very simple shapes that can be drawn with the Rectangle tool (M) or even the Pen tool (P). Draw closed shapes as shown below.

8. Color each part of the roof separately. We will assumr that the light is coming from the left side in our picture. Notice how all planes that face left are lighter.

9. For the little house like structure over the roof, use the Pen tool (P) and draw shapes as shown.
10. Fill colors as indicated below.

11. To create the line texture on the wall, use the same blend process as before. Draw a line each at the top and bottom of the wall with line weight 5pt. Keep the line color # 3B2314. Select both lines and blend them in 5 steps this time.
12. Draw the grey part of the roof with the Pen tool and color it as shown.

Roof Windows
13. For the topmost windows, draw a rectangle with the Rectangle tool (M) (as step 1 below). To get the perspective of the window right, tweak the corners of the rectangle to match the line texture beneath it (step 2).Now duplicate this rectangle 3 times, scale it to make it smaller and arrange each one on top of the other as shown (step 3). Fill each rectangle with colors values as shown in steps 4 to 7.

14. Draw a skewed rectangle as shown in step 8 and then select all the shapes together and click Window > Pathfinder > Divide. Delete the unwanted parts of the window. Unite the parts that we do not want divided using the pathfinder panel. Delete unwanted nodes and shapes thoroughly. Fill colors as shown in step 9 to complete our window.
15. Duplicate the window two times. Scale the duplicated windows to make them smaller and arrange them as shown.
The Chimneys
16. The two small chimneys are nothing but two vertical rectangles. Draw the chimney walls as shown with the Rectangle tool (M). Tweak the rectangles by moving nodes with the Direct Selection tool (A). Color them as shown. Duplicate the chimney once, scale it a bit to make to smaller and place it behind the top roof.
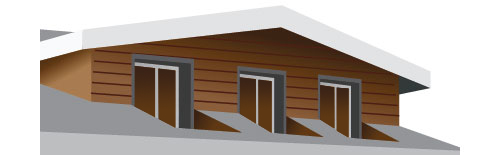
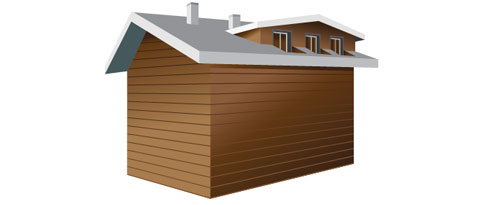
17. This is how our house looks at this stage.
The Red Windows
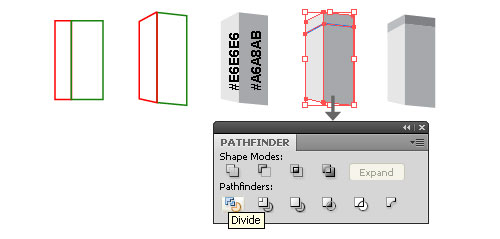
18. We will build the red windows along the textured lines of the side walls. Let us start with the closed window first. Draw a rectangle with the Rectangle tool (M) (step 1). With the Direct Selection tool (A) tweak the corners of the rectangle to match the lined texture of the wall (step 2). Duplicate this rectangle twice, scale it to make it smaller and arrange each one on top of the other as shown (step 3). Color each rectangle with color values as shown in steps 4 to 6.
19. Draw a vertical thin rectangle to make the division of the window and color it a darker red. For the texture on the window doors use the handy blend option and follow the steps we used before (for the texture on the walls). For the lines I have used line color # 981B1F. Duplicate this window 2 times, tweak its perspective to create the remaining two windows. Always follow the texture of the walls for correct perspective.
20. To create the open windows, simply follow the steps as shown below. Draw rectangles with the Rectangle Tool and tweak them with the Direct Selection tool (A) (step 1). Fill colors as shown (step 2). Draw 2 more triangular shapes for the shine on the window glass (Step 3). (temismarketing) Color these shapes as shown with a white gradient from Opacity 100% to 0%.

The Doors
21. The doors are similar to the windows but taller. For the closed door, follow the same steps used for the closed windows. For the opened doors follow the steps and colors used for the open windows. Again, use the lines on the walls for correct judgment of drawing.
22. This is how the house should look once the doors are done.

The Balconies
23. As all the balconies are at a different eye level we will first define the base of each balcony. The next step will be to build the railing. The lines of the front wall will be our guidelines for perspective.
24. Draw shapes for the base of the balconies as shown with the Pen tool. Fill them with #404041.

25. First we will create the middle balcony. The other two balconies can be built by following the same steps. The railing for each balcony is made up of 3 stripes. Draw shapes as shown for thickness of the balcony base and the bottom part of the railing.

26. In the drawing above, the green outlined shape is the thickness of the balcony base. The yellow outlined shape is the front side of the railing stripe and the red shapes are the sides of the railing stripe. Color these shapes as shown.

27. Group all parts of the stripe of the railing we just created, copy the group and paste it in front at the same place (ctrl+F). Select it and shift it up by pressing the up arrow key a few times. Repeat this process one more time to make the third stripe of our railing. The railing for the middle balcony is done!
28. Build the other two balconies similarly. Repeat the process followed but with appropriate perspective. Our house is now completely built!
Creating the Sky Background
29. Our house will look even more beautiful with a great background. To create the bright blue sky, make a new layer and place it at the bottom of the layer panel. With the Rectangle tool (M) draw a rectangle covering the entire artboard and fill it with a radial gradient as shown.

30. To make the top part of the sky a bit darker than the rest of the gradient, we will add a linear gradient at the top. Draw a rectangle which covers the width of the artboard. Use a dark blue gradient and reduce the opacity of the color at the bottom to 0%. The new gradient should appear merged with the colors below it.

The Meadow
31. For the meadow, draw the shapes with the Pen tool and color them as shown.

The Trees
32. For the coniferous trees, open the Symbols panels by going to Windows > Symbols in the main menu. Click on the panel menu on top right corner and select Open Symbol Library. Select the Nature library. In the Nature library you will find the ‘Trees 1’ symbol. Drag it onto the artboard on a separate layer. Select the symbol and click the Break Link button that appears in a row just below the main menu. This will break the link of the symbol and you can edit it freely.
33. As the trees are a part of the background, we will make them lighter so that they don’t stand out too much. Apply colors to the trees and arrange them behind the shapes of the ground as shown. Make color variations for different parts of the trees to make them more interesting.

The Yellow Wildflowers
34. For the stem of the plant, draw a slightly bent thick line with the Pen tool (P) and go to Object > Path > Outline Stroke in the main menu (step 1). Fill the resulting shape with a green gradient using the gradient tool (step 2). Draw the leaves with a pen tool as shown (step 3) and fill shades of green as shown in step 4.
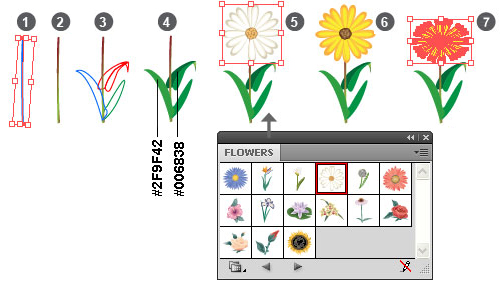
35. To create the flower, go to the Symbols panels, click on the panel menu on top right corner and select Open Symbol Library. Select ‘Flowers’ Library. You will find the ‘Daisy’ symbol in the library. Drag it onto the artboard (step 5) and click Break Link button like before.
36. Select the petals and color them in shades of yellow. I have used # F9EC31 for yellow and # FAAF40 for orange shades (step 6).
37. Select the flower with the Selection tool (V). Click on the top middle node of the bounding box and drag it down. This will make the flower a little flatter (step 7). Group the flower plant, duplicate a few times and make different size variations and arrange them on the meadow.
Grass and Clouds
38. To enhance our picture, we will add patches of grass on the meadow and clouds in the sky. Access the Symbol library once again and open up the Nature library. Drag the ‘Clouds 2’, ‘Clouds 3’ and ‘Grass 4’ symbols onto the artboard.
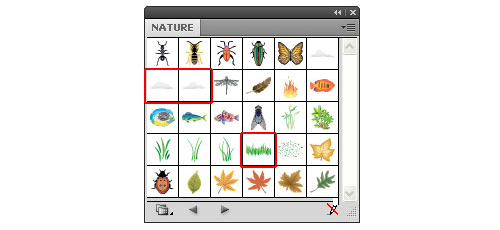
39. Break links to the symbols and make color and size variations in them. Arrange them as you like, but make sure the grass at the farthest end should be smallest in size.
Our cozy looking wooden house is ready!
To download the source file for this tutorial, you will need to login as a member.
Sign up today to access all exclusive members content!

Awesome.
Thank you for your beautiful post.