

This Illustrator tutorial go through some really basic and important Illustrator techniques while showing you how to create a realistic cup of coffee from scratch. You will learn interesting techniques on how to use the Appearance Panel in Illustrator CS6 with its very useful features. Using various techniques, we can create really realistic water effects. Let’s get started!
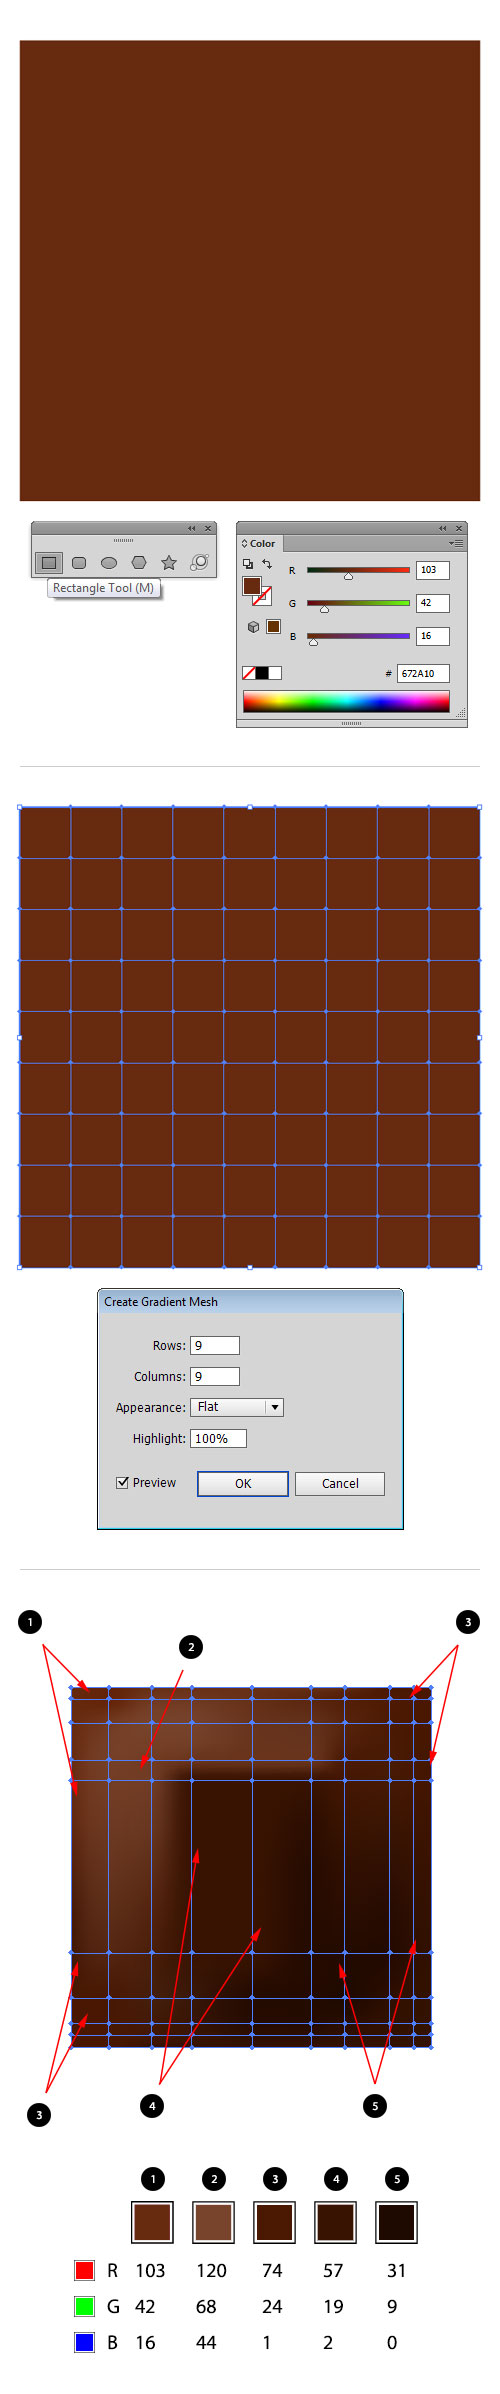
1. Open up a new document and set the dimensions of the Artboard to about 800 x 800px. Pick the Rectangle Tool (M) from the Tools Panel and make a rectangle with the following dimensions: width – 800px, height – 800px. Keep the object selected, and choose medium brown (R=103, G=42, B=16) in the Swatches Panel to set the fill color. When done, go to Object > Create Gradient Mesh option and the dialog box will appear on your screen. In the ‘Rows’ text field type 9 and in the ‘Columns’ text field type 9. Leave the other settings at their defaults and hit OK. Use the Direct Selection Tool (A) for grid line distortion and movement of the nodes. Now pick the colors from the Color Panel as shown in the image below.
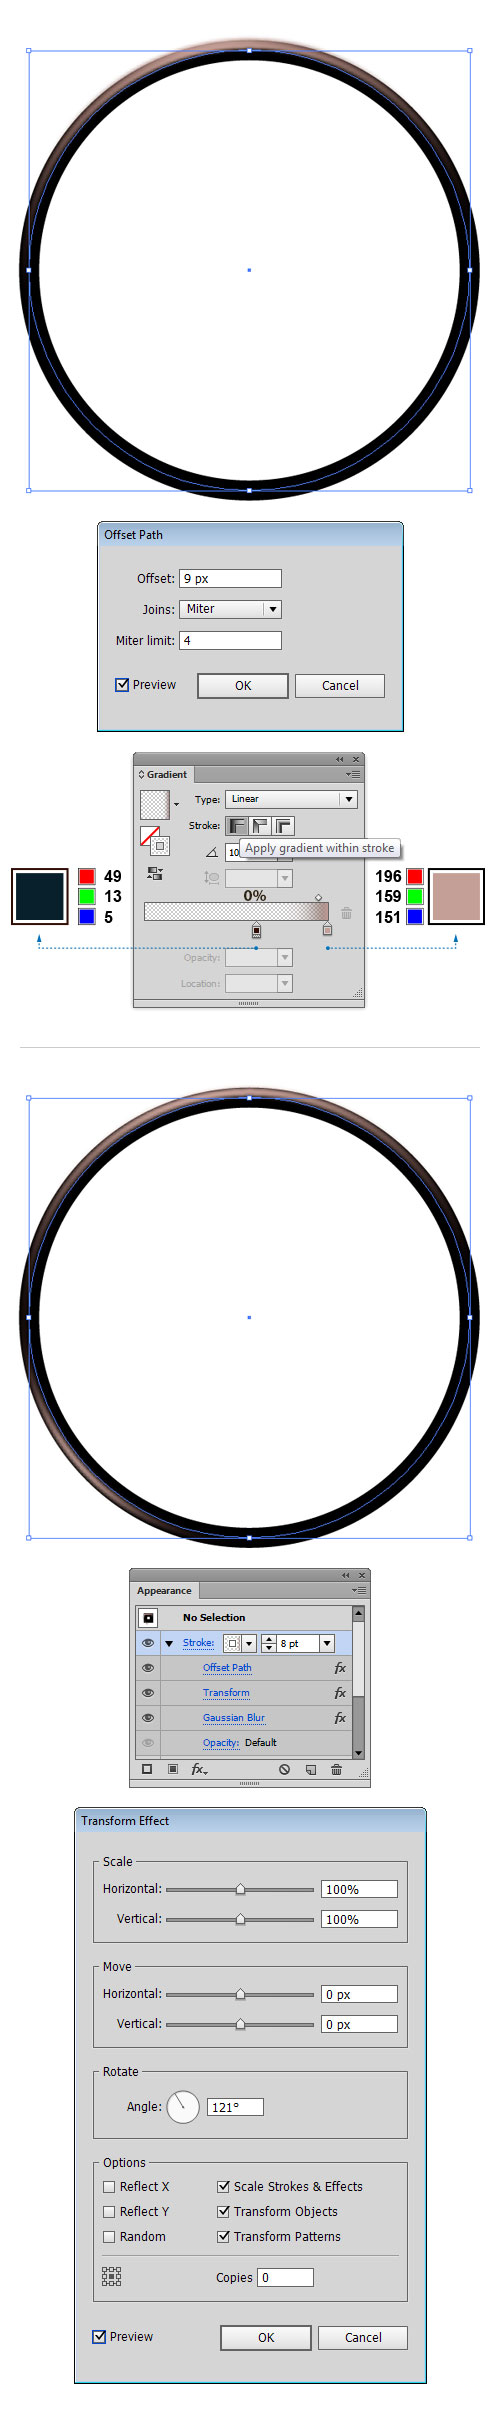
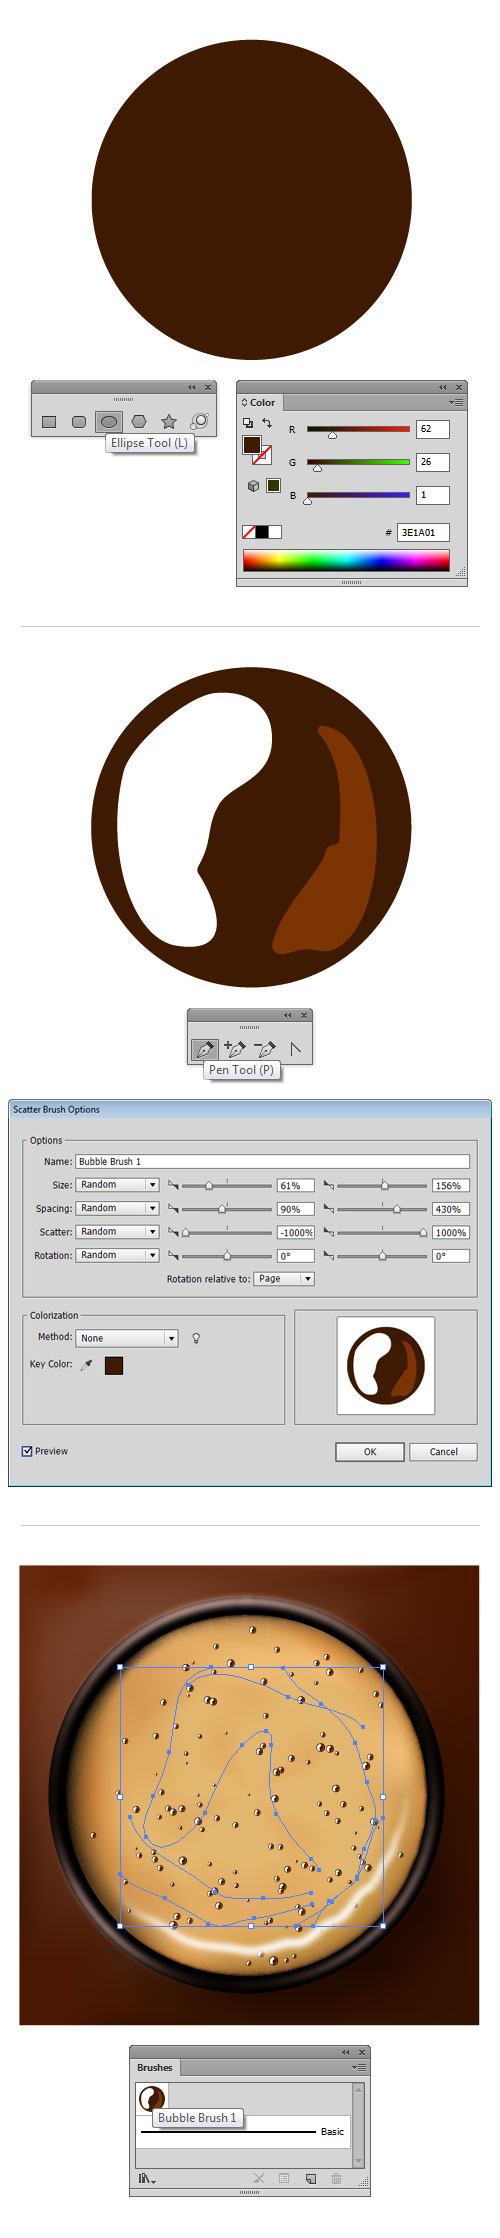
2. Let’s get started with the cup first. Grab the Ellipse Tool (L) and create an ellipse, whose dimensions should be set to about 660 x 660px. Do not fill the shape, but apply only a stroke to it (Stroke Weight: 30pt). In the Color Panel set the stroke color to black (R=0, G=0, B=0). Turn on the Appearance Panel and from the fly-out menu choose option “Add New Stroke”. Once done, a new “Stroke” attribute will appear in the Appearance Panel, just above the “Stroke” attribute we have created previously. Keep the path selected, and in the Stroke Panel choose the ‘Width Profile 6’, to apply a given style to the line. Set the Stroke Weight to 11pt. When you’re done, apply the gradient within stroke by clicking first icon in the Gradient Panel and fill the resulting shape with linear gradients: dark brown (R=49, G=13, B=5) and pink (R=207, G=168, B=159). We need to offset this stroke outward couple of points. First, go to Effect > Path > Offset Path… and select an offset of approximately 4px and hit OK. To get a realistic cup highlight, select Effect > Blur > Gaussian Blur to open the dialog box. In the Radius text field enter 3 and hit OK.

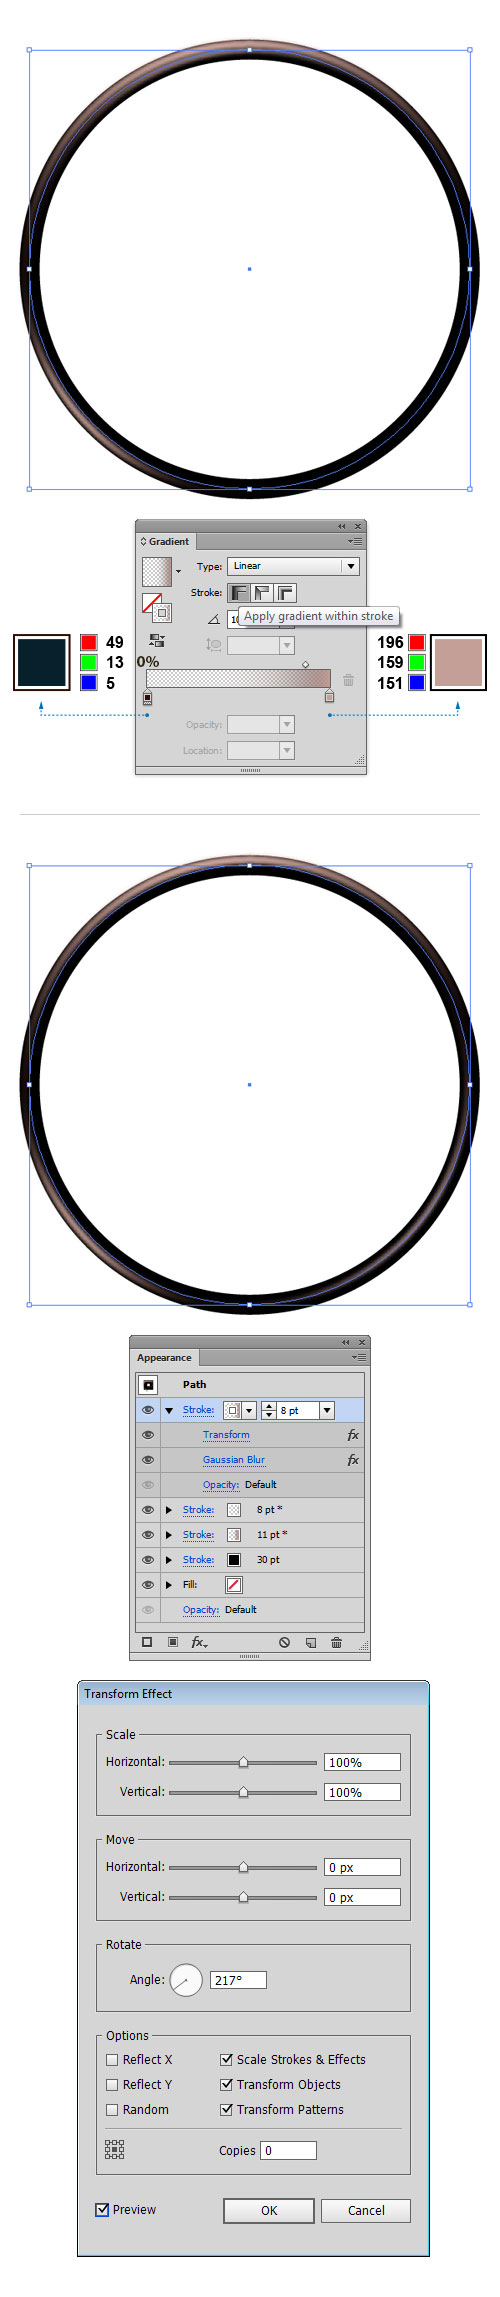
3. Select the “Stroke” we created in the previous step and click the Duplicate Selected Item button to create another “Stroke”. As you can see, we duplicated a “Stroke” attribute along with the content hidden within it. The color scheme should remain the same, but we need to edit the gradients the way you can see below. Then, change the Stroke Weight to 8pt. Click on the Offset Path effect to bring up the dialog box and we are free to edit the effect. Now enter 9 in the Offset field and confirm with OK. To move the highlight along the path, go to Effect > Distort & Transform > Transform… and apply the shown values and hit OK. Finally, keep the Blur effect intact.
4. It’ time to create a new “Stroke”. Duplicate the previous attribute the way we did in the step 3. So far, we have four “Stroke” attributes and an empty “Fill” attribute. Keep the last attribute active and open up the Gradient Panel. You can now adjust the gradient color stops until you have the desired result. Activate the Offset Path from the Appearance Panel and delete the effect. Now click on the Transform effect and apply the values as shown below. Lastly, keep the Gaussian Blur effect as it is.
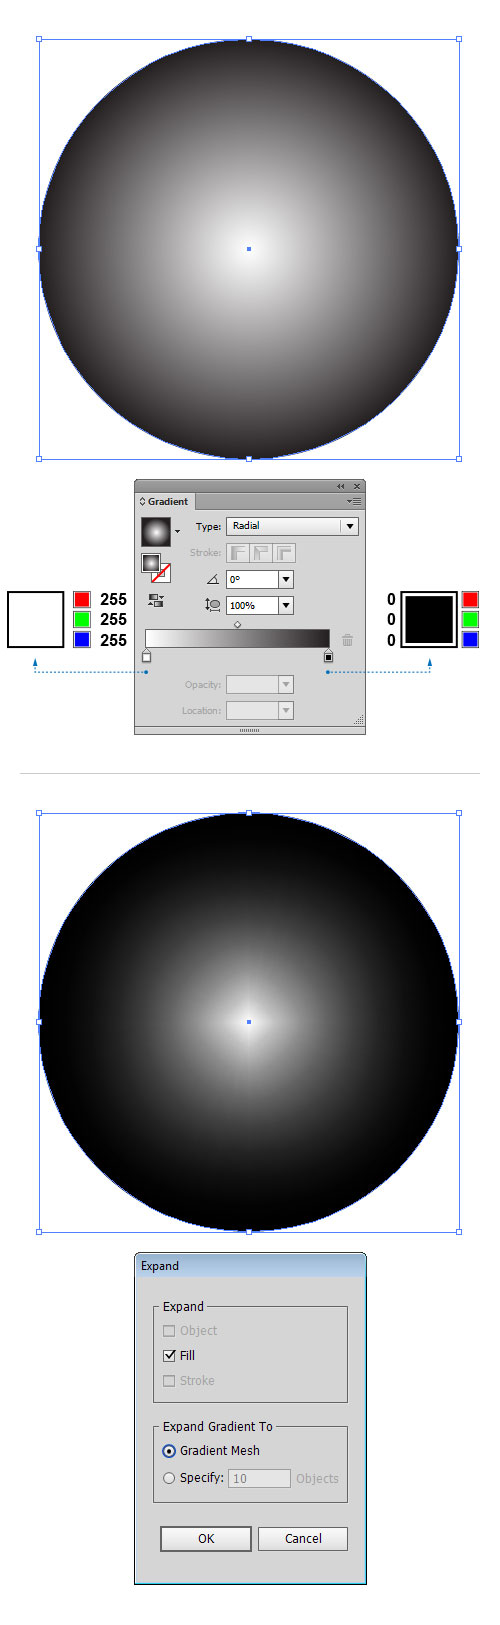
5. Let’s focus on the coffee itself now. Pick the Ellipse Tool (L) and draw a 630 x 630px circle inside the edges of the cup (refer to the image). Open up the Gradient Panel and fill the resulting shape with radial gradients as shown below: white (R=255, G=255, B=255) and black (R=0, G=0, B=0). Now keep the object selected and click on top menu Object > Expand in order to expand the object. Once the dialog box appears, just check Fill and Gradient Mesh and then hit OK. You should end up with something similar to the image below.
6. There is a clipping mask applied to the object, which we have to remove. To do this, go to Object > Clipping Mask > Release to release the objects from you mask. With everything still selected, ungroup the objects (Shift+Ctrl+G). The clipping mask path is no longer needed. The easiest way to get rid of it is to view the document in Outline mode, move the mesh object a bit away from its initial position, then select and delete the path. Select the Mesh Tool (U) and add a mesh line by clicking on the shape. If you decide to go into more detail, you can add as many mesh lines as you want. Select each mesh point individually or select multiple mesh points using the Lasso Tool (Q) and apply the colors. If you want, you can easily make the adjustments by pulling some control handles. Be free to experiment and find what works best for you. When you’re done, you should get something like the image below.

7. We need to apply some highlights to the coffee surface to make it look more realistic. Grab the Pen Tool (P) from the Tools Panel and create a curved line, as shown in the image below. Keep the path selected, and in the Stroke Panel choose the ‘Width Profile 1’, to change the Variable Width Profile of the stroke. Go to the Color Panel and set the stroke color to white (R=255, G=255, B=255). In the Stroke Panel set the Stroke Weight to 16pt. With the help of the Twirl Tool we can distort the path a bit. Simply click and hold the Width tool to view a pop-out menu of the seven Liquify tools. Then release your mouse over the tool you want to use. Hover over the edge of the path and then click and hold. The longer you hold your click the more the shape will twirl. To vary the options double click on the tool in the toolbar. This allows you to control the twirl and how big it is and at what angle it is drawn. Play around with the settings until you are happy with the results. To feather the edges, go to Effect > Stylize > Feather… and type 5 in the Radius field and hit OK. After that, keep the path selected and go to Effect > Blur > Gaussian Blur, and apply a 3px blur effect to it.

8. As our cup of coffee has just been stirred, we are going to add some bubbles to the surface. Grab the Ellipse Tool (L) and draw a circle, whose dimensions should be set to about 10 x 10px. Open up the Color Panel and fill the object with dark brown (R=62, G=26, B=1). Using the Pen Tool (P) create two irregular shapes next to each other and fill the resulting shapes with white and medium brown. Place the objects over the circle we have created previously. Once done, select all and group them (Ctrl+G). While the objects are still selected, in the Brushes Panel click on the New Brush button. Pick the Scatter Brush option to open the dialog box. When the Scatter Brush Options appear, enter the values shown in the image below and click OK. In the Brushes Panel choose the brush we have already created and using the Paintbrush Tool (B) draw a few freehand paths over the entire coffee surface. In the Stroke Panel select different stroke weights as indicated.
9. Using the same techniques described above, we can create another custom bubble brush. Grab the Ellipse Tool (L) again and create a 6 x 6px circle (hold Shift to constrain the proportions). Once done, activate the Color Panel and fill the shape with dark brown (R=39, G=6, B=0). Then go to Window > Brushes to open the Brushes Panel. With the Brushes Panel open, just drag the shape into it to create a new Brush. The dialog box will appear, then choose Scatter Brush option and hit OK. Enter the values shown in the image below and confirm with OK again. Using the Paintbrush Tool (B) start drawing the paths across the coffee surface and apply the brush we have just created, as shown below. To modify an existing Scatter Brush, deselect all paths and double-click the brush to display the Scatter Brush Options dialog box. When you decide to modify the brush, move the Maximum and Minimum Spacing sliders to the right or to the left in order to increase or decrease density levels of the bubbles. Once you are satisfied with the result, hit OK to confirm the changes.

10. To complete the scene, we just need to decorate a coffee with whipped cream. Pick the Pen Tool (P) and draw several irregular shapes, as shown below. Once done, fill the resulting shapes with pure black and group the objects (Ctrl+G). Keep the objects selected, and in the Brushes Panel click on the New Brush button. Pick the Scatter Brush option to bring up a new dialog box. Make sure you have entered the values as shown in the figure below and click OK. Grab the Pen Tool (P) from the Tools Panel and create some text of your choice. Open up the Color Panel and set the fill color to medium brown (R=39, G=6, B=0). The stroke color should be set to dark brown (R=77, G=36, B=1). In the Stroke Panel set the Stroke Weight to 1.5pt. Finally, select all objects and choose the newly created scatter brush as a stroke, and you’re done!

View the list of all 101 Illustrator special effects tricks at 101 Illustrator Special Effects.
