
This tutorial will show you how to draw a nice sunglass using gradient mesh in Adobe Illustrator. I have made it simple to follow so that you don’t need to be an expert to draw a sunglass like this. It can be done with a few tools and techniques. It is a very good tutorial on learning the complicated gradient mesh tool. Enough said, let’s find out how this is done.
Drawing the Vector Sunglass

1. So we can start working with the sunglass now. Open Illustrator and make a new document. To make a new document, go to the file menu and select New or simply press Ctrl+N. From the new dialogue document box, give any name you like in the name input box. Choose 800 x 600 preset from the size drop down menu. Set the units in points and click on the Landscape orientation. You can select CMYK or RGB color mode for working.
Click ok to create a new document with the settings you given

2. To draw the sunglass proportionally, we can use a reference image as shown above. This image helps us to draw lines and fill it with colors for later working with meshes. Don’t worry about the picture size. Use it as your reference image. If you need a high quality image of the same reference, click here to download it.
3. Once you have saved the above image, you can place it in Illustrator for drawing. So, to place this image, go to file menu and select Place and choose the image to place in your document. After placing the image for reference, you can easily resize it as you like. To resize the image, select the selection tool or press V. Then click on the image and use the corner points to resize it.
Tip: Also use Shift, Alt for while resizing for correct proportion and placing.
4. Start tracing over it with the pen tool. Select the pen tool from the toolbox or press P to select it. Click on the stroke color in the tool box. Or press X to cycle through fill color and stroke color. Once you clicked or selected the stroke color, click on the ‘none’ color button as shown in the above image. The next step is to set the fill color. So select a dark red color for it.

5. You can now start drawing with the Pen tool. Click and drag the with the Pen tool for bezire corners to help you the draw the curves.
Tip: If you have trouble with drawing fills without seeing the correct lines in the reference image, click on the ‘none’ color button in the tool box while drawing or selected the fill. You can later fill the line with color.
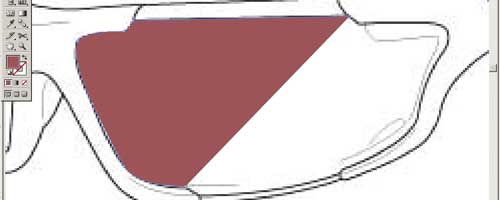
6. Use the pen tool to draw the second lens of the sunglass.

7. Start filling the frame with color.
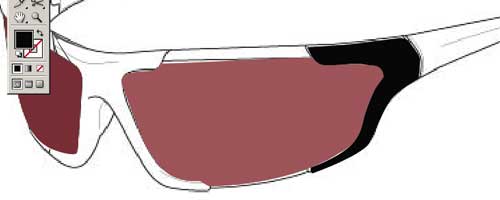
8. When you have completed
the above step, we can move on to another part of the sunglass. Follow what you had done in the previous steps and make a filled black layer as shown.


10. While you are working with the Pen tool or anything in Illustrator, it is very helpful to see your work it outline mode for adjustments. To view your work with only lines as shown below, press Ctrl+Y. To return to the fill mode, you can again press Ctrl + Y.

11. ![]() The Mesh tool helps you to work on your fills with gradient. To start with mesh tool, select the mesh tool from the tool box. Or you can use U for the Mesh tool.
The Mesh tool helps you to work on your fills with gradient. To start with mesh tool, select the mesh tool from the tool box. Or you can use U for the Mesh tool.
Tip: Keep in mind the following shortcuts. it is very useful while working with the mesh tool.
![]() Mesh tool: U
Mesh tool: U
![]() Eye dropper tool: I
Eye dropper tool: I
Warning: Never select a color when you select any fill. If you do so, the entire fill will be changed. Select color to be applied after selecting mesh points or after deselecting any fills.
After you selected the Mesh tool, select a light red color wich matches in the above picture gradient. Then move the Mesh tool pointer on the end of fill of the left part sunglass and click once. It is clearly indicated in the below picture with a red circle. Do the same for the right part of the sunglass indicated with red circle.
If you have trouble or made a mistake, just use the direct selection tool to select the meshes part by part. When you selected a part of the mesh, you can press delete key in the keyboard to delete it.

12. After you have completed it, deselect all layers by pressing Ctrl+Shft+A. We will countinue on creating the mesh for the black frame. Select a grey color and use the Mesh too and just make one or two click on the parts of the sunglass to get the effect as shown below. Don’t make many clicks. You can undo any mistakes you made by pressing Ctl+Z.

It is not easy to manage the mesh points but it is easy to click on a specific place with clear view of color spreading.
Tip: If you having trouble with the reference image, just lock it. To lock the image, press Ctrl+2. You can unlock all by pressing Ctrl+Alt+2.
13. The next step is to add some gradient effect on the black frame of the sunglass. To add the gradient effect, select grey color from the color picker as fill color. With the mesh tool, you can add the effect. So, choosing the wrong place for your mesh points on the frame may not give you the correct effect. This how our frame looks like before adding the gradient effect is as follows.

14. The red circle indicates the position where you can use the Mesh Tool to apply the gradient effect. So with the Mesh tool with grey color selected from the color picker, click on the black frame of the sunglass indicated with red circle. You may get one of the effect as shown below by clicking with the Mesh tool.

15. Now we want to add some shadow details to the frame. So use the Pen tool to draw a shape as shown in the below picture. After drawing the shape, fill it with black color. Place it as shown below.


16. You can use the same technique to the bottom left part of the frame. You only need one click with the Mesh tool to make the effect as shown below. In the next step, you can add some reflections on the lenses of the sunglass.

17. To do as shown below, with the Mesh tool selected, but no layers or fills selected (If selected, deselect all). In the above picture,
Step 1: Picture shows the current status of the lens fill.
Step 2: Use Mesh tool. Select white color from the color picker and apply it as shown in the picture.
Step 3: Use Mesh tool. Select white color from the color picker and apply it as shown in the picture.

18. This is a sample gradient mesh used in this tutorial for making the sunglass. See a sample work made with this technique within few minutes.

19. Now to modify the effect, select white color and click once in the top of the lens layer fill. To make the realistic effect which shows many lights reflection, add one more click on the layer.
Tip: You can also set the color of the mesh parts color by selecting points of meshes with the Mesh tool.

20. See how it works on the glass and its frame.

21. The next step is to add some transparent effect of the sunglass. Actually you don’t need to make any transparent layer. But to create the transparency effect, we can add a dark color to the sunglass as shown above. Which plays the role of the back parts of the entire sunglass. Adding some reflective touches will be more attractive. So, use the Mesh tool to add some gradient effect.

22. The below picture will show you how to add highlights to make it more realistic. It is quite simple. These highlights are newly created with the Pen tool. So, use the Pen tool to draw these addition layers on top of your sunglass. After drawing the new reflection layers as shown in the picture, fill it with white color and go to Window menu and select Transparency palette to enable it. Use the sliding bar to reduce the transparency.
See the sample below that shows the making of a window’s highlight on the ball. Here, the window is a new layer made with Pen tool and placed on the ball with low transparency.

23. The same technique is used in our work as shown below.

24. Our sunglass is almost done. Add some more highlights and details to complete it.

Drawing the Background
25. Select Rectangle tool. Use M as shortcut. Draw a rectangle. Click and drag with the Rectangle tool.

26. We will use the Mesh tool to create a nice gradient mesh. Select white color and click on the rectangle filled layer as shown below.

27. Add a few more gradient points as shown.

28. Add more effects to make the sunglass more attractive. You can add shadows with the same technique. This is what I have done.
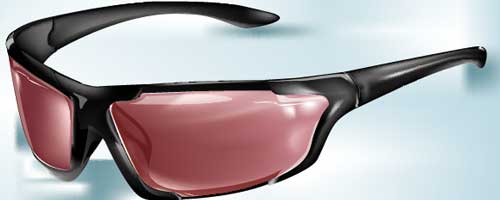
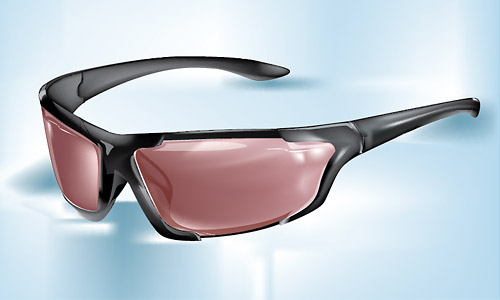
29. We made it! Here is the final illustration of our vector sunglasses done in Illustrator.

To download the source file for this tutorial, you will need to login as a member.
Sign up today to access all exclusive members content!

nice color comb., i love d design…,,thanks
fantastic you have a done a v v v wonderful work with a simple way.
Anyone have a the stock image to the sunglass? The link from the is no longer valid.
Hey this is nice