Follow this tutorial and learn how to draw a egg yolk using Adobe Illustrator. The tutorial is composed of two main parts: creating the egg white and the yolk along with the shells. You will start from the basic tools together with some vector shape building techniques. You will learn how to create the main shape of the egg white, yolk and the shells. Moving on, you will learn how to work with gradients and how to add effects for some of the shapes that make up your broken egg. Finally, you will learn how to add subtle highlights and shading, then how to add the illustration background for your artwork. So let’s begin!
Difficulty: Intermediate
Requirements: Adobe Illustrator
What will you get?
- Instant download of PDF e-book (29 pages, 45 steps)
- Comes with Ai file for easy reference
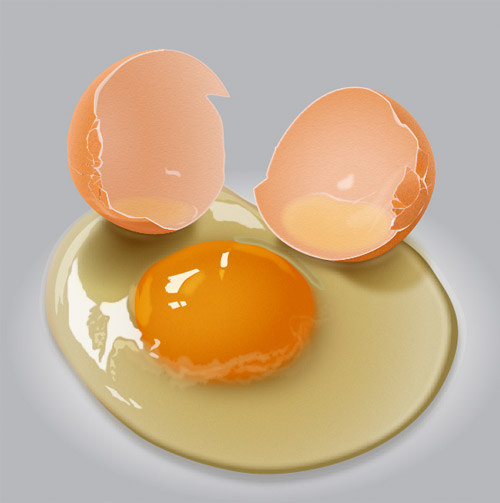
- Detailed step by step tutorial to draw a nice realistic Egg Yolk
Tutorial Preview:
Create the Shells
18. Using the Ellipse Tool (L), create a 263px by 274px object then go to the Object > Transform > Rotate. Enter a -30 degrees Angle and click OK. Make a duplicate of the new ellipse and adjust the shape of it similar to the third image below. After you are done adjusting the shape of the new object, reselect the ellipse and remove it.


19. Fill the new object with the radial gradient as shown below. Keep the resulting shape selected. Go to the Object > Path > Offset Path. Enter a -2px Offset and click OK, then replace the existing color of the new shape with the new radial gradient. Make sure that the resulting shape is still selected, go to the Effect > Texture > Texturizer. Follow the data as shown in the third image and then click OK. Next, apply a 3px Feather effect for the result.


20. With the help of the Pencil Tool (N), draw a black object as shown below. Select the pink shape created in step 19, duplicate and bring it to front. Keep this selected, hold down the Shift key and click on the black object. Open the Pathfinder palette (Window > Pathfinder) and click on the Intersect button. Replace the existing color of the resulting shape with the new radial gradient.


21. Reselect the shape created in step 20 and go to the Object > Path > Offset Path.
Enter a 2px Offset and then click OK. Replace the existing color of the new shape with
R=235, G=198, B=179. Now select the pink shape created in step 19. Duplicate
and bring it to front. Keep this selected, hold down the Shift key and click on the new
shape created in this step. Go to the Object > Clipping Mask > Make (Ctrl +7).
Finally, press (Ctrl +Left Square Bracket) once to get the result as you can see in the
fourth image below.


22. Using the Pencil Tool (N), draw three objects and fill them similar with the images below. Reselect these new shapes and go to the Object > Path > Offset Path. Enter a 1px Offset and click OK, then replace the existing color of the copies with R=235, G=198, B=179. Next, move the resulting shapes 1px to the right and press (Ctrl +Left Square Bracket) three times to get the results as you can see in the third image.


23. Select all the orange shapes created from step 20 up to this time and make a duplicate
(Ctrl +C, Ctrl +F) of them. While the duplicates are selected, go to the Effect >
Stylize > Grain. Follow the data as shown below and click OK, then reduce the
Opacity of the resulting shapes to 70%. Next, apply a 7px Feather effect for the
biggest shape and apply a 3px Feather effect for the remaining shapes.


24. Repeat the process in step 20 to create an object similar with the image below. Once your object is drawn, fill it with R=244, G=217, B=206, then press (Ctrl +Left Square Bracket) several times to hide it behind the pink shape created in the step 21.


... end of preview. Sign up for premium membership to read the whole tutorial!

