
Filmora from Wondershare includes the typical trimming, transitions, and overlays, as well as the effects that we’ve come to expect from enthusiast-level video editing software.
Filmora can get the job done, and its interface is simple and pleasant to use, but it lacks some of the fine control that competitors provide.
Different Video Editing Modes
When you initially open Filmora, you’ll be given four options for editing modes, each of which has a name that indicates the program’s focus: Action Cam, Full Feature, Instant Cutter, and Easy Mode.
Unfortunately, after you’ve entered one mode, you won’t be able to change it. The app must be restarted. For example, the Fix, Speed, and Color modules in Action Cam mode contain the tools required for this genre.
Very Simple Interface
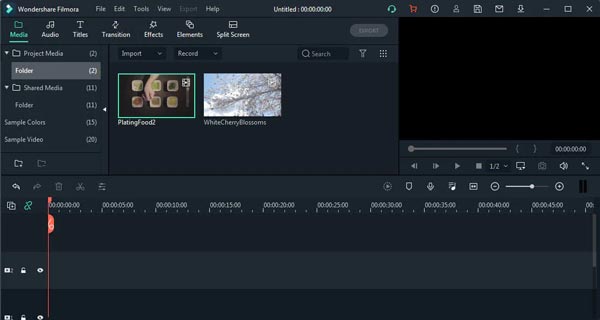
The interface and workflow of Filmora are among the most user-friendly of any video editing tool. The main interface contains all tools and functionalities, such as inserting text and transitions, applying filters, and exporting clips.
Filmora Pro can be learned in a matter of minutes, whereas other programs can take hours to master.
Recording Videos
This video editing software allows you to record videos from your webcam or PC screen. You can also use it to record your voice. The video file will be uploaded to your library automatically, and you can then drag it onto your timeline.
Wide Selection of Filters
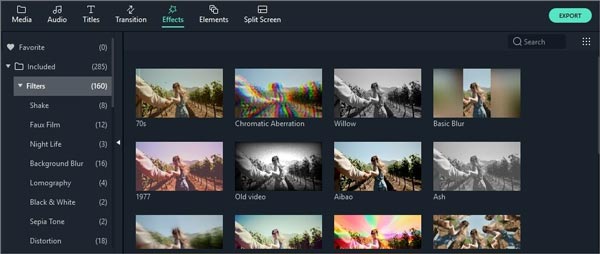
You can apply as many filters as you wish to Filmora Wondershare. Select the filters or overlays you want to use in your project by clicking on “Effects” in the media library.
Hover your mouse over the effect you’d like to use. Click on the plus sign in the center when you see it. The effect will be added to the timeline after that. You can use background blur filters to replace the black bars in a “portrait” clip (9:16) in a 16: 9 video format.
This video editing app organizes all of its filters and overlays by subject category (for example, Faux Film or Bokeh Blurs) so you can find them quickly. Start watching by going to the “Effects” menu and looking at the categories on the left side of the screen.
Convenient Import Features
Filmora supports standard, HD, and even 4K video import. Your media clips, including imported movies, photos, and audio files, will be stored in the media library, where you can access them quickly and easily without having to create additional directories.
Extended Color Grading

To enter the “Advanced Color Adjustment” box, click the “Color Palette” icon after dragging the video onto the timeline.
Many free templates are available under the “Preset” menu, including 3D LUT, Vignette, Shared, Movie, Custom, and Favorites. Simply double-click the required template and drag it onto the video.
- White Balance: This setting allows you to change the color temperature. You can choose a warm color by moving the light slider to the yellow side, or a cold color by sliding the light slider to the blue side.
- 3D LUT: color correction presets are commonly utilized as part of the digital intermediate process while making movies.
- Color: you can modify the exposure, brightness, contrast, saturation, and shine in this section.
- Light: Change the basic settings, such as glare, shadows, and BW, to modify the video’s lighting.
HSL: stands for hue, saturation, and brightness, and it’s utilized to optimize your clip’s particular color spectrum.
Audio Equalizer

The audio equalization tool allows you to tweak the sound to create the ideal mix of sounds. As a result, the various instruments and vocals will blend seamlessly.
To use the equalization, double-click on the audio in the timeline to bring up the Audio Inspector window. Select settings such as default, pop, rock & roll, soft, classic, low bass, lively, country, techno, hard rock, acoustic, folk, and blues in the “Equalizer” tab.
Additional settings can be accessed by clicking the “Customize” button.
Changes Preview
When the setup is complete, every Filmora video editor lesson mentions that you can watch the film in “Compare Before/After” mode. In the Side by Side, Left to Right, or Stacked displays, you can do this.
If you’re not happy with the settings, use the Undo / Redo option in the preview box to re-configure everything.
Audio and Text Synchronization
The volume of the part of the clip where the text and effects are displayed can be reduced by the user. You may not only add sentences, but also gorgeous animation and effects to them.
Many people have compared the Filmora captioning technology to Lightworks video editing software.
Artificial Background Blur

If you want to focus on one area of the clip while blurring the others, use the Tilt-Shift tool. The Mosaic feature allows users to blur certain areas of a movie and alter the percentage ratio that causes the blur to increase or decrease.
Split Screen Function
You can use this feature to make videos that have many clips and frames that are displayed in the same video at the same time. To do so, go to the left-hand side of the screen and pick the split screen icon.
The split screen settings will appear, from which you may select how many screens you require and where they should be placed.
Is Filmora Free?
Filmora is not free software, but it does offer a fully functional free trial with one restriction: exported videos are watermarked with a Filmora banner over the bottom third of the output.
There are two major purchasing options: a one-year license for $39.99 (or $44.99 for the Mac version) that must be renewed annually, or a lifetime license for $69.99 in one payment.
These licenses are only good for one computer, however, multi-seat licenses are available on a sliding scale based on how many copies you want to use at the same time.
If you already own the software but have misplaced your license key or are reinstalling it on a new computer, you can retrieve it by selecting “Retrieve Registration Code” from the “Register” menu at the top.
This will take you to the Wondershare website’s support section, where you can input the email address that was used to buy the product. You’ll get an email with your registration code, which you may use to get full access to the software again.
Wrapping Up
Filmora is a powerful video editing tool designed for people who like to concentrate on their creativity rather than the technical aspects of film production. Its careful combination of an easy-to-use UI and professional functionality makes it a decent bargain for beginner and intermediate content creators, but more experienced users will want something with a little more flexibility and customization in the editing process.