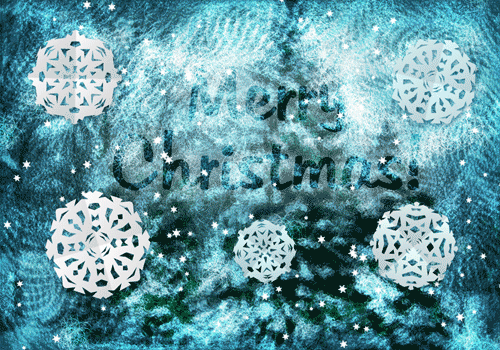

Christmas is coming soon! In this premium tutorial, we’ll create a frosty Christmas window for this holiday season and try different backgrounds for it – starting from simple gradient, to vector landscape, to any winter photos. We’ll be using various effects, two types of brushes, pathfinder and transparency panels, and even one mesh object to create this wonderful holiday scene. You will also learn how to create realistic paper snowflakes from scratch!
Requirements: Adobe Illustrator
What will you get?
- Instant download of PDF e-book
- Detailed step by step tutorial
- Learn the techniques to create glass textures
- Learn to create realistic paper snowflakes
- Comes with Ai file for easy reference
Tutorial Preview:
18. Okay, so our frosty glass is almost ready. Create a new layer and name it SNOWFLAKES. Let's stick some snowflakes cut out of paper to our window. We'll create them actually the same way we did it in childhood, folding the paper and cutting holes in it. Turn Smart Guides on (Ctrl + U) as we'll need precise positioning here.
First, create a large 8-ended polygon either manually (with arrow keys and Shift pressed), or by pressing Enter (insert 200 for radius and 8 for ends), colors don't matter now. Draw 2 lines (\) that intersect its center and two neighboring corners (smart guides will indicate when lines meet center or anchor point of polygon). Now, select all 3 objects and press Divide in Pathfinder panel. Ungroup (Ctrl + Shift + G) and delete the larger shape. You'll get a segment for future snowflake - 1/8 of it.

19. Now, we'll cut the paper. To do it, grab Pen Tool (P) and create about 10 irregular shapes with corner points. We don't need rectangles or polygons, and especially ellipses, because they look too perfect - we have to imitate holes cut with scissors, that's why we need random irregular shapes. Refer to the image below - draw objects with Pen and then position them onto the segment, both on its borders and in the middle. Colors don't matter now.

20. Now, make a copy of these objects (segment and small shapes) by Alt-dragging them aside (we'll need them for other snowflakes). Select one of groups and Alt-press Subtract in Pathfinder panel to make a Compound Path. (NOTE: For illustrator CS4, you won't need to press Alt to make a compound path)
Now, change the fill color of the shape to light blue and stroke color to none. We need one of the borders of our shape to be perfectly vertical. So lastly, if your shape is positioned like mine, take a Rotate Tool (R), press Enter and insert 22.5 for angle, click OK.

21. Take the Reflect Tool (O), and with a segment selected, Alt-click precisely on its right border, now choose Vertical axis and click Copy. Select both shapes now and grab Rotate Tool (R), Alt-click on the lower corner point and insert 90 degrees, click Copy. Now, press Ctrl + D twice - and the main shape is ready. Now, just select all segments and Alt-press Add button in Pathfinder panel to make it a single shape.

22. Scale your snowflake so it's around 200-250 px height, and open Appearance panel (Shift + F6). With the shape selected, add new fill to it. Change new top fill to default black-to-white linear gradient, and adjust it in the Gradient panel so that it is black-white-black-white (refer to the image below). Now, with top fill selected, open Transparency panel and change blending mode to Multiply and opacity to 10-20%. This way we can imitate the look of a folded paper.

... end of preview. Sign up for premium membership to read the whole tutorial!


Really lovely effect for this Chrismas!
Interesting frosty effects. Thanks for sharing!
Interesting frosty effects. Thanks for sharing!
+1
really nice effects here, well done.
what a great post, happy christmas to you.
Most Business Knows How to Use Google ,But Most DO Not Know How their Businesses SHOULD Utilize Google to its Benefit \
I’m impressed, I have to admit. Seldom do I come across a blog that’s both equally educative and amusing, and without a doubt, you’ve hit the nail on the head. The issue is something which not enough people are speaking intelligently about. Now i’m very happy that I
came across this in my hunt for something regarding this.