
Halftone is a very nice effect you can use to create pop art or grunge work. In this quick illustrator trick, I will show you how to create a nice vector halftone effect easily. You can also import gray scale photos and apply the halftone effect to your artwork. But for this tutorial, I will just show you how to create a simple halftone text effect.
1. Type your text using a thick font. In this case, I chose to use Rockwell Extra Bold. After that go to Object > Expand to expand the text.
2. Make sure you set the document color mode to CMYK. Go to File > Document Color Mode > CMYK to change it to CMYK. Apply a gradient from white to black. Make the black is pure black (C:0% M:0%, Y:%0,K:100%). Apply the black to white gradient on the text.

3. Now is the interesting part. Go to Effect > Pixelate > Color Halftone. Set the Max Radius to 5 and see the effect. The Max Radius determines the size of the halftone circles.
So try with different Max Radius to experiment with the effect.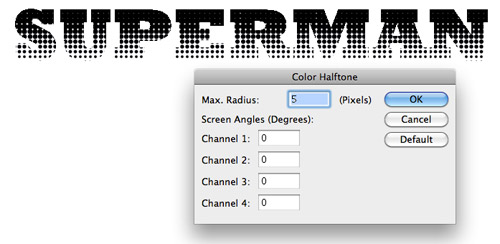
4. The artwork is still in bitmap form. We will need to convert it to vector. Select it and go to Object > Expand. Next go to Object > Live Trace > Make and set the following values for Live Trace. Live Trace will convert it to vector.

5. The traced artwork now contains black and white paths. We just need the text, so let’s proceed to delete the white background. Use Direct Selection Tool to select the white path and go to Select > Same > Fill Color. Press delete.

6. We are now left with the black path, you can now fill it with gradient and change it to any color your like. Below is what I have done. Hope you find this halftone tutorial useful.

Hi Tony
After apply Effect < Pixelate Expand command, because the command is off! I think your mean is Expand Appearance command instead of Expand.
And also after Live Trace we should use Object > Expand, that doesn’t written in this tutorial
After apply Effect < Pixelate Expand command, because the command is off! I think your mean is Expand Appearance command instead of Expand.
And also after Live Trace we should use Object > Expand, that doesn’t written in this tutorial
we can not use Object > Expand command, because the command instead of Expand.
Dude I am a newbie and my result doesn’t seem to look like yours at all. Please tell me what size of font are you using and how to aplly the damn gradient filter vertically:)
Cheers!
hiiiiiiiiiiiiii tony good morning
i want learn illustrator full flezed
also, your last step isn’t needed if you just check the box “ignore white” in the live trace dialogue box. 😉
This was great and helpfull
hi tony plz i need to learn about storyboard , i want to learn how to do it in ill..thank u so much
wE can not use Object > Expand command, because the command instead of Expand.
to anyone who didnt follow it correctly
here do this….
press “T” for command text
then type your desired word or what so ever…
then after typing…click the mouse out of the word that you type then select it again…then ctrl+shift+o (creating outlines) you can find it on type tool bar or just right click the word then you will see it…then just click the ctrl+8 to balance the gradient…now after putting the gradient to make it a half tone like sir tony did…go to effect>pixelate>colorhalf tone….then so on..so you guys can now follow the step six for finishing..^^,
4.7644 cm W
1.7448 cm h
that is the size of my own work…cause i try it also in a big sized…and it shows up different
Pretty! This was a really wonderful article. Thank you for supplying these details.