

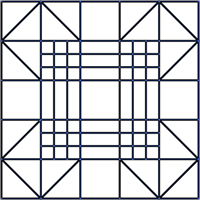
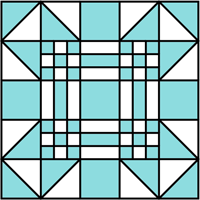
This step by step tutorial demonstrates creating and coloring the above quilt blocks. The same drawing is used for both blocks, the coloring is inverted. This quilting pattern is made up of symmetrical blocks which begins with a basic square.
1. Start with the rectangle tool to draw a square
In your new or existing Illustrator document, set the fill color to none and the stroke to black (1 px) as shown in the toolbar below. Using the rectangle tool, click once on the artboard to define a square 100 pixels x 100 pixels. Any square size will work, but for this example, 100 x 100 will illustrate the method.

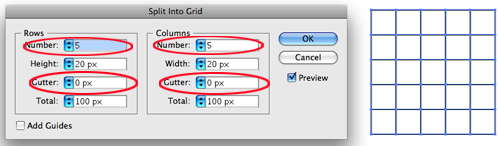
2. Split the square into a 5 x 5 grid
With the square selected, choose from the menu Object, Path, Split into Grid. Set the number of rows and columns each to 5, and set the row and column gutters each to 0. Press OK. NOTE: You may not be able to set the number of rows or columns to 5 until the gutter has been set to 0. You can do this by first setting the number of rows or columns to 2, setting the gutters to 0, then going back to the set the rows or columns to 5.
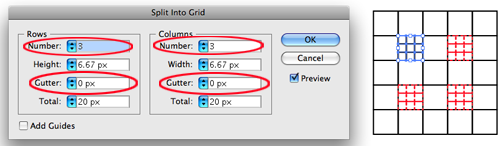
3. Split grid squares into 3 x 3 grids
Now the 4 grid squares shown below in red will be split into 3 x 3 grids.

With the first grid square selected, choose from the menu Object, Path, Split into Grid. Set the number of rows and columns each to 3, and set the row and column gutters each to 0. (Lowpricebud) Press OK.
Repeat for the remaining 3 grid squares to achieve this result:

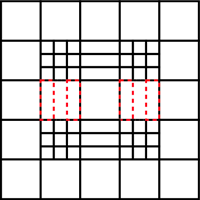
4. Split grid squares into 3 rows
Now the 2 grid squares shown below in red will be split into 3 rows.

With the first grid square selected, choose from the menu Object, Path, Split into Grid. Set the number of rows to 3, and set the row gutters to 0. Leave the column number as 1. Press OK.

Repeat for the other grid square to achieve this result:

5. Split grid squares into 3 columns
Now the 2 grid squares shown below in red will be split into 3 columns.
With the first grid square, choose from the menu Object, Path, Split into Grid. Set the number of columns to 3, and set the row gutters to 0. Leave the row number as 1. Press OK.

Repeat for the other grid square to achieve this result:

6. Draw lines to create triangles from grid squares as shown below in red.
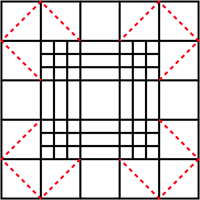
From the menu, select View, Smart Guides, and ensure that this is turned on with a check mark by the menu item. The colors should still be set as before, with the fill set to none and the stroke set to black (1 px).
Select the pen tool from the toolbox, and click the corners of the squares in the sequence shown below to make the triangles. Because you have Smart Guides turned on, it will assist you to be precise by clicking on the anchor points which appear as your mouse reaches the corners.

After the 4th click, press and hold the Command button on Mac (Control button on PC), to quickly switch to the selection tool and click anywhere outside of the block object, then release the Command or Control button. This will end the pen tool drawing segment and you will be ready to draw the next section.
Don’t worry if the mitered corner points extend slightly outside of the main block; the black lines will be removed after the object is colored.
Continue with the remaining 3 corners to achieve this result:
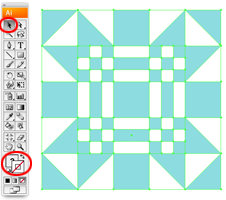
7. Now the block is ready for coloring.
Using the black selection tool, marquee around the block object to select the entire block. From the menu, select Object, Live Paint, Make.

Select the Live Paint Bucket tool, and select a fill color of your choice. Set the stroke to none. As you hover over the block, the defined sections will be highlighted. When you click, the highlighted section will be filled with your fill color. Click on the outer corners to color as shown.

Proceed to color the rest of the block object based on the pattern shown.
8. Remove black lines
Remove the black lines by selecting the entire block object and setting the stroke color to none.
Your quilt block is ready to use!

9. Changing colors
The color can be quickly changed. Still using the Live Paint Bucket tool, select another color (for this example, brown), and triple click on any section of the original color.

Invert the color in 2 steps. Select another fill color (for this example, teal), and triple click on the white area.
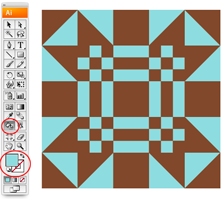
Now select a white fill, and triple click the brown section.

Your quilt block is ready to use as you wish! Add a square with no fill and matching stroke behind it to create a border. Use the block to duplicate in your design, or drag to the symbols palette for reptitive use. You may also want to try using the recolor artwork feature to change the color using the color wheel.

To download the source file for this tutorial, you will need to login as a member.
Sign up today to access all exclusive members content!

This is lovely, thank you… 🙂
Amazing…
Awesome, thank you. I either forgot you could add grids to specific objects or never knew! This will surely be helpful in the future.
Cool tutorial. Thanks.
I like this tutorial. Thanks for sharing :^)
Great Tutorial
Thanks
thanks a lot
I like
Its really useful and it will make easy the tough design. thank u………………
Thanks darling.