
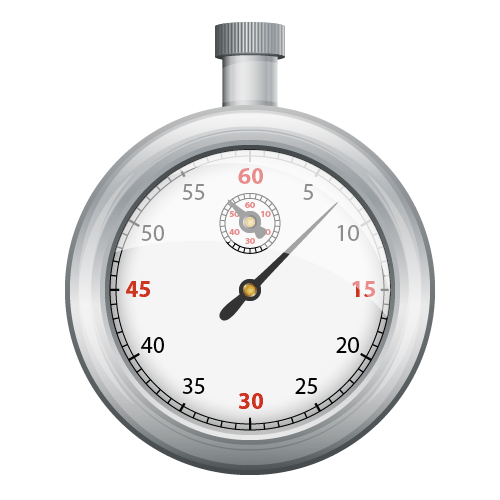
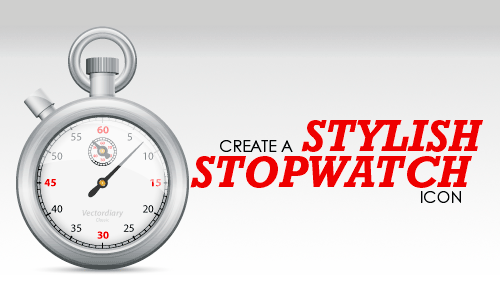
In this tutorial, I’ll be showing you how to make a stylish vector stopwatch icon with the use of some basic techniques in Illustrator. You will learn lots of useful Illustrator tricks to speed up drawing of a clock face. Hope you enjoy this Illustrator tutorial and maybe even discover some new methods along the way.
Creating the Stopwatch Case
1. For the first step open a new document 600px wide and 800px in height. It doesn’t really matter about the color profile but I like to work in RGB.

2. Next make sure smart guides are turned on by going to View > Smart Guides. Then with the Ellipse Tool (L) selected, find the center of the art board, hold down Alt/Option and click one time the center of the art board to bring up dialogue box. Enter the value 370 for both width and height and click okay to create a perfectly centered circle.

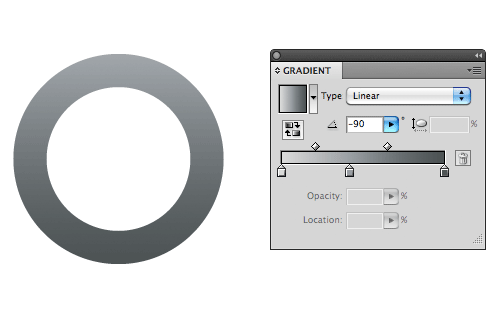
3. Fill this circle with the linear gradient shown and set the angle to -90 degrees. The colors are (196, 196, 196), (132, 138, 147) and (68, 75, 76).

4. With the circle still selected go to Object > Path > Offset Path, set the value to -5px and then give it a linear gradient using the colors (218, 218, 218), (153, 158, 163), (233, 233, 234) and (76, 83, 84).


5. Repeat step 4 this time giving an offset path of -30px and use the linear gradient (153, 158, 163) and (233, 233, 234).

6. Repeat this two more times making offset -5px for each. Give the first the same gradient as your original circle (196, 196, 196), (132, 138, 147) and (68, 75, 76) but in the gradient box click the Reverse Gradient button so that the darkest color shows up at the top. For the second circle, simply give it a solid fill color of light gray (245, 245, 245).
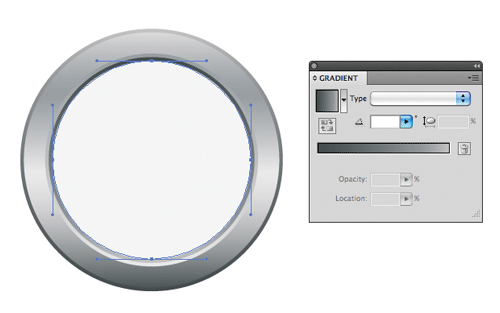
7. Now we’re going to go backwards. With the solid gray circle still selected once more bring up the offset path options but this time enter 20 for the value. Then swap the fill to a stroke (X) and give it a weight of 2px. After this go to Object > Path > Outline stroke.

8. Give it a linear gradient with the following colors (153, 158, 163), (223, 223, 224) and (76, 83, 84).

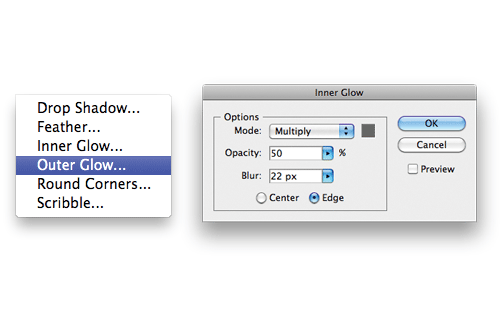
9. Select the solid gray circle which we’ll be using for the watch face and in the Effect menu select Stylize > Inner Glow. Change the color to a dark gray (102, 102, 102) and enter the values below. Then press OK.
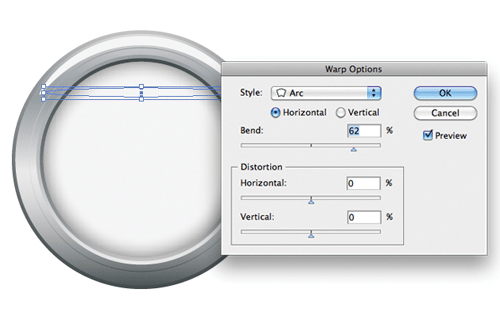
10. Use the Ellipse Tool (L) click once again locate the center of the art board and holding down Alt/Option click once. Enter the value 280px for Width and 13px for Height. Click OK. Then using the Selection Tool (V) while holding shift to keep it in a straight line, drag the new ellipse to the top of the stopwatch face so that the edges and somewhere in the center of the metal casing but don’t worry about being too accurate. From the Effect menu choose Warp > Arc, insert a bend of 62% then click OK. We don’t need it to stay editable so go to Object > Expand Appearance.
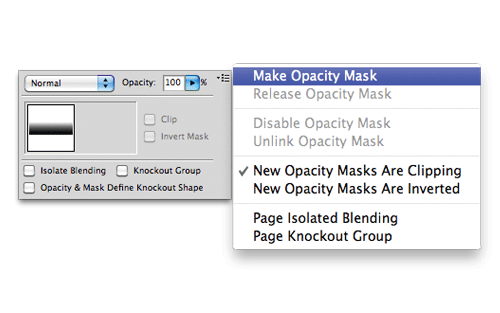
11. Now using the Rectangle Tool (M) draw a rectangle the same width and height as the object you just arced then fill with a basic black and white linear gradient. Change location for center to be about 32.

12. Keeping it selected go to Select > Next Object Below. Then holding Alt/Option and Shift on the keyboard reselect the rectangle just created. With both shapes selected in the transparency window’s right hand corner, click to bring up a drop-down menu and select Make Opacity Mask.
13. Select the Ellipse Tool (L) and change the stroke to white with no fill. Then Alt/Option in the center of the art board and create a circle that is 330px. Change the weight of this to 20px and then in the stroke panel give it the Profile: Width Profile One.

14. Now go to Object > Path > Add Anchor Points and using the Direct Selection Tool (A) select the point at the very top and remove it using the Delete key on your keyboard.
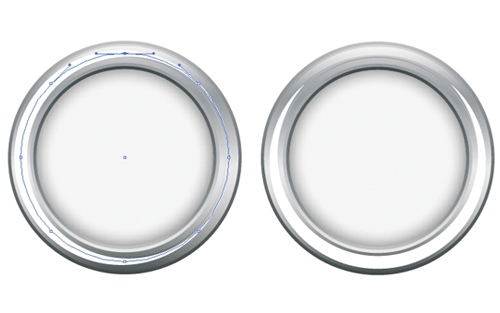
15. Keeping it still selected, go to Object > Path > Outline Stroke to turn it into a solid shape. Change opacity to 55% and change the Blend Mode to Soft Light. Make a copy using Ctrl/Cmnd + C and Paste in Front with Ctrl/Cmnd + F. Now flip this shape 180 degrees using the Direct Selection Tool and holding shift move it to the top of the stopwatch, approximately 60px or until it looks like below.

Creating the Face
16. Now select the watch “face” with the inner glow then Copy and Paste in Front. Set the fill to none and stroke to 1px black. Then give this an offset path of -6px.
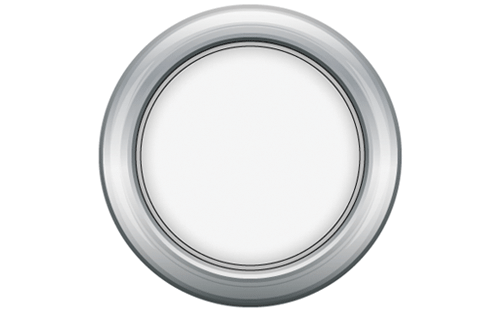
17. For the next step, select the Line Segment Tool (/) and click somewhere on the art board that is not the stopwatch itself. Enter the following values and click OK. Now change the stroke color to something bright and easily recognizable and give it a weight of 2px. Do this two more times making a line that is 9px and one that is 6px. Change the colors of each making sure that all 3 lines are different. Then change the smallest stroke to a weight of just 1px.

18. Select all three lines using the Selection Tool (V) and then holding down Shift click on the watch “face”. Let go of shift and then click once more on the face. You’ll see that it now has a thick blue line around it meaning it’s a Key Object.

19. In the Align panel select Horizontal Center followed by Vertical Top and it will put all three lines in the center of the art board and at the top of the watch’s face, exactly where they need to be.

20. Holding shift click on the face of the watch to deselect it and then go to Object > Path > Outline Stroke to making the lines solid shapes. Click anywhere on the art board to deselect the newly formed rectangles. Now reselect the largest of the three, select the Rotate Tool (R) and then from the View menu select Outline. This allows you to see the center more accurately and if you’re using Smart Guides (Ctrl/Cmnd + U) it will snap into place. With the Rotate Tool hold Alt/Option and click in the center of the stopwatch to bring up a dialogue box. Being the longest rectangle we want it to represent every 10 seconds that passes and if you don’t want to do the math Illustrator will do it for you. There are 6 “10 seconds” in one minute and 360 degrees in a circle so simply type 360/6 to get the number 60. Now hit Copy.
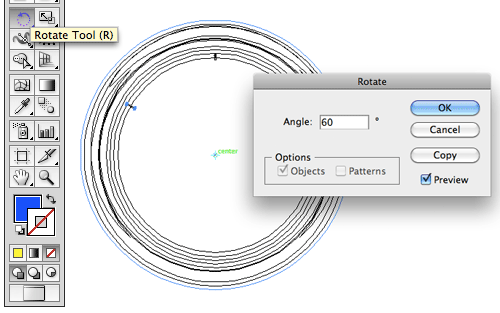
21. Keeping the copy selected Transform Again by using the keyboard shortcut Ctrl/Cmnd + D and make four more copies. Before deselecting it, go to Select > Same Fill Color and then hit Ctrl/Cmnd + G to group them together.
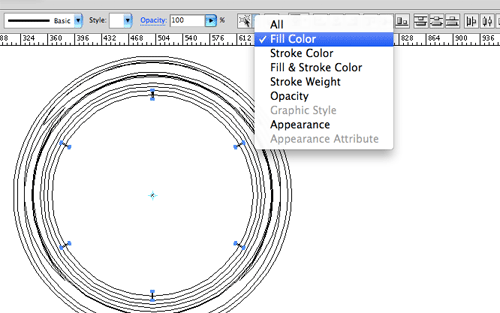
22. Now repeat steps 20 and 21 this time with the mid-sized rectangle and do do the math 360/12 since it represents every 5 seconds. You should end up with an angle of 30 degrees. Copy until all positions are filled. Then do the same for the smallest marker which is for 1 second, this time using an angle of 6 (360/60). Hit Ctrl/Cmnd + Y to exit Outline mode.
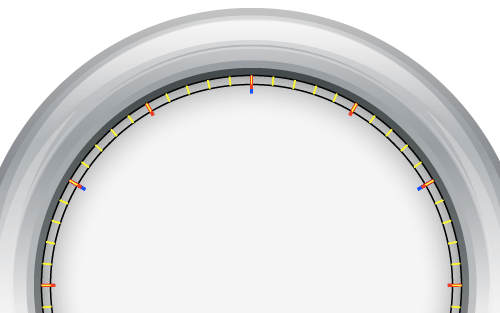
23. Select all three lengths of of the seconds markers and then in the Pathfinder Window hit Unite to make them all the same shape and color. Change the fill to black.

Adding the Seconds
24. Using the type tool type the number 60. I used the default font Myriad Pro with a weight of 24px but feel free to experiment with others. Center it with the art board and drag it to the appropriate position on stopwatch face. With the text still selected pick the Rotate Tool (R) and holding Alt/Option click in the center of the stopwatch. You may need to go back into Outline mode (Ctrl/Cmnd + Y) to for this. In the dialogue box enter 30 for the angle and hit Copy. Then Transform again using Ctrl/Cmd + D and fill the rest of the clock.
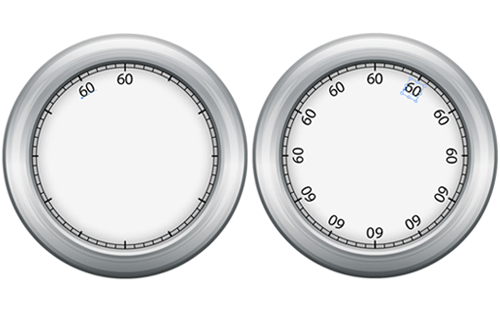
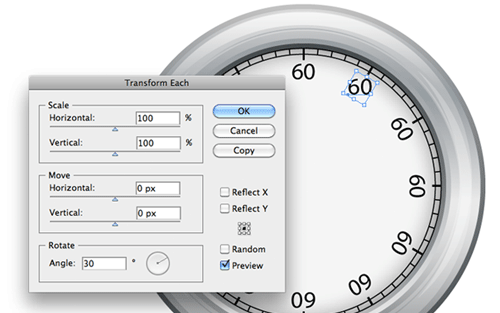
25. Now we have to rotate all the numbers so they face the right direction. Simply keep the last “60” selected and go to Object > Transform Each. Scale should be 100% and Move values set to 0. The only thing we want to change here is the angle, enter 30 degrees and click OK.
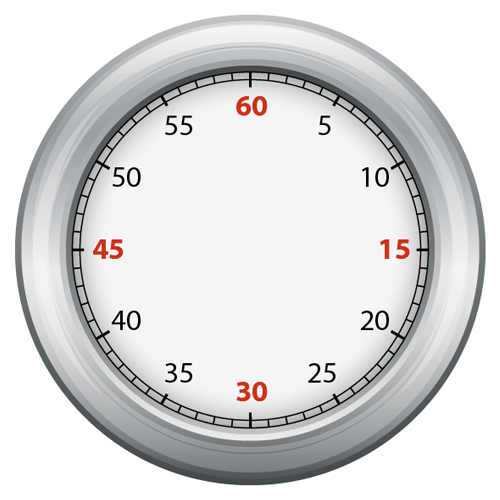
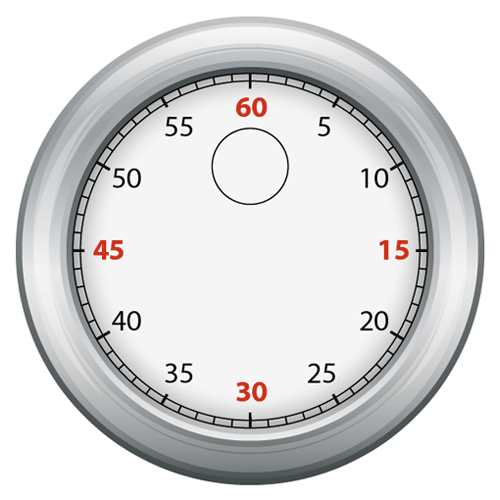
26. Select the next number and use the keyboard shortcut Ctrl/Cmnd + D Transform again. You’ll need to hit the D key the appropriate number of times for each or you can just hold it down to speed things up. Once everything is in place change the numbers to the seconds they correspond to, making the 60, 15, 30 and 45 bold and color filled with red. You may also need to drag the number 5 a little to the right to make it fit better. You should end up with something like this.
27. Select the Ellipse Tool (L) and set stroke to a weight of 1px black with no fill. Alt/Option click on the center of the art board to bring up the dialogue box and enter the value 60px for both width and height. Holding Shift drag this new circle up to the appropriate position.
28. With the circle still selected, give it an offset path of -5 then click OK. Now using the Line Segment Tool (/) draw a line that connects the two rings you just created. Keep this line selected and then use the Rotate Tool (R) Alt/Option to click in the center of these smaller circles and enter 12 for the angle then hit Copy. Transform again 28 times.


29. Next select the numbers 10, 20, 30, 40, 50 & 60 then Copy and Paste in Front. Holding Shift together with Alt/Option scale down roughly to the size of the smallest circle you just made, centering them by eye is fine for now. Use the Eyedropper Tool (I) and click on the number 60 to change them all to bold and in red, adjust the size of the font to around 9px and finally with everything still selected group them together using Ctrl/Cmnd + G. To center them accurately hold Shift, click on the circle just outside the numbers then release Shift and click again. This creates a Key Object and you can align the numbers to it vertically and horizontally.


Making the Hands
30. Now onto drawing the hands. Select the ellipse tool and Alt/Option click in the center of the watch face. Enter 10 for both values in the dialogue box. Fill this with a radial gradient using the colors (242, 220, 142) and (201, 150, 26).

31. Keep the circle selected and give it an Offset Path of 2px. Then go to Windows > Swatch Libraries > Gradients > Metals and select Bronze. Set the angle to -90.
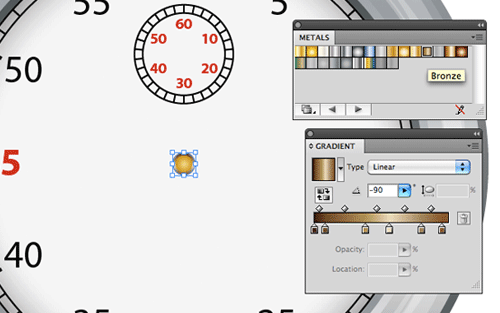
32. Create another Offset path from this new circle, give it the value of 4px and fill it with a dark gray (51, 51, 51). Keep it selected go to Object > Path > Add Anchor Points. Do this twice. Select the point at the very top using the Direct Selection tool and then drag it while holding Shift just above the number 60.

33. Now select the anchor point at the very bottom of the circle and hold down Shift on the keyboard and nudge it down three times using the arrow keys. Then zoom in and use the Direct Selection Tool (A) pull the handles of the anchor point until it’s the same width as the circle itself. Select all three shapes and group them together.

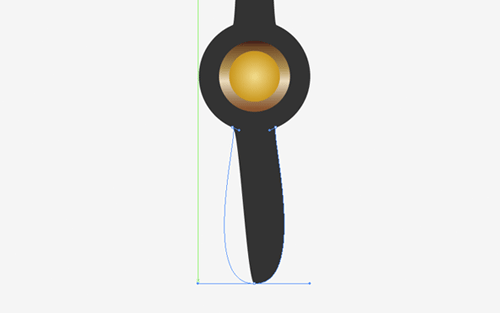
34. Copy then Paste Behind using Ctrl/Cmnd + C followed by Ctrl/Cmnd + B. Holding Shift, nudge the duplicate to the left two or three times and then up until it’s inline with the millisecond portion of the stopwatch. Release shift and make smaller nudges if necessary. Grab the point at the very top of this shape using the Direct Selection Tool (A) and drag it down while holding shift so that it’s just larger than the entire millisecond part. Then do the same for the bottom, dragging it up to cover half of the 30. Now nudge right and back into the center.
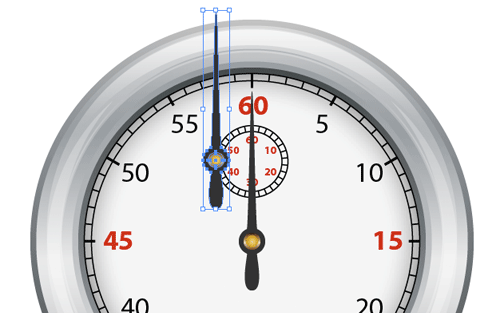
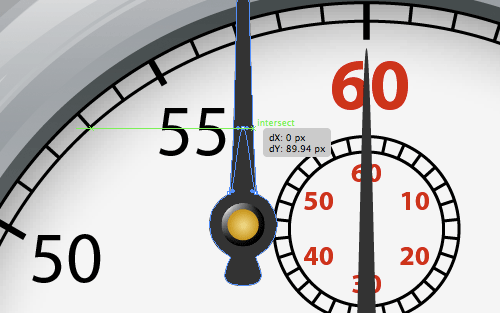
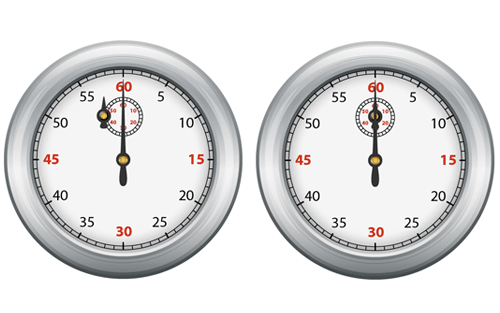
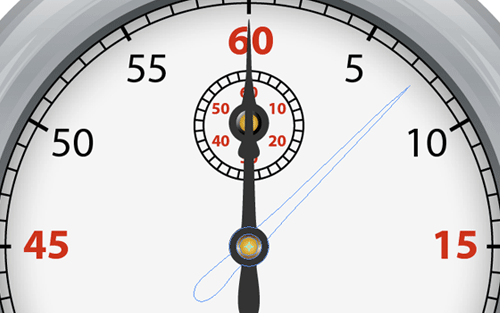
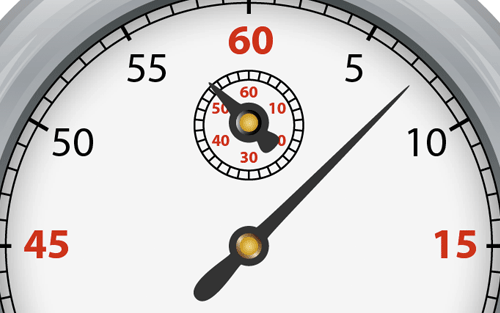
35. Now let’s rotate them. Select the largest hand and then use the Rotate Tool (R) click on the center of it. Holding Shift rotate 45 degrees. Repeat for the second hand this time making -45 degrees.
Reflection
36. For the last part of the stopwatch’s main body we just need to do the glass. Copy and Paste in Front the main section of the face which has the outer glow and then set fill to default (D). Remove the stroke since we won’t be needing it then go to Object > Arrange > Bring to front. Give it an opacity of 55%. Now, with the circle still selected hold down Alt/Option drag it off to the bottom left. This creates a copy so simply stretch out the right side forming an ellipse.


37. Holding shift select both pieces of glass and in the Pathfinder window hit Minus front. Make two copies of this new reflection and paste both in front. Drag the top shape to the left and make it bigger so you only have a small section of what’s beneath it showing. Once again select this and the shape beneath it and then in the Pathfinder select Minus Front. Change the opacity to 65%. Go to Select > All and group together using Ctrl/Cmnd + G.


Putting a Lid On It
38. For the top portion of the stopwatch we need to select the ellipse too and make a rectangle 9px in height and 70px in width. Then fill it with a linear gradient at -90 degrees, using colors: (153, 158, 163) and (53, 58, 59). Next using the Direct Selection Tool (A) select the top anchor point and then Copy and Paste in Front twice. While the second is still selected hold down Shift and nudge up 3 times. Now select the anchor point to the left of this and hold Shift ans select the same anchor point for the copy below. Hit Ctrl/Cmnd + J to joint the point. Repeat for the right side to close the shape. Fill this shape with a linear gradient using colors (76, 83, 84) and (153, 158, 163)


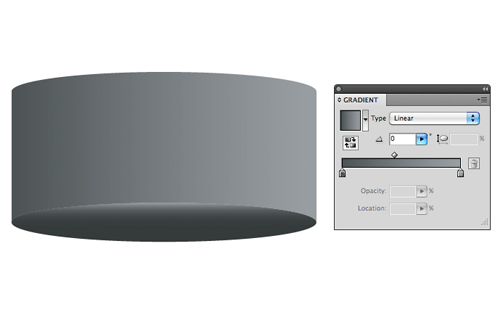
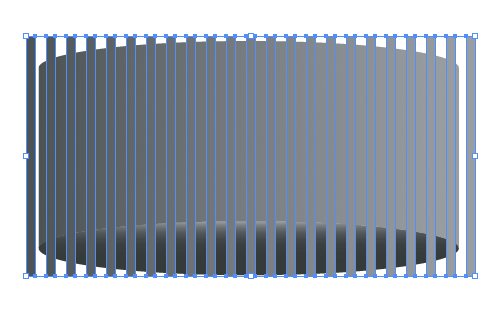
39. Use the Rectangle Tool (M) and draw a rectangle approximately 1.5px in width and just make sure it’s longer than the shape you just created. About 40px should do the trick. Hold alt/option and drag a copy about 2px to the right. Then keeping the copy selected hold down Ctrl/Cmnd + D to make enough copies to cover the area of the shape created earlier.


40. Once you have enough, select all of the rectangles and in the pathfinder while holding down Alt/Cmnd + Unite them and Expand. Now go to Object > Arrange Send to Back. Make a copy of the biggest shape paste it in front. Holding shift also select the ridges you previously sent to the back then in the Pathfinder panel Alt/Cmnd click on Intersect and Expand. Now fill with the linear gradient (76, 83, 84);,(233, 233, 244), (153, 158, 163) and (218, 218, 218). Select all three of these shapes and align horizontally to the center of the art board.


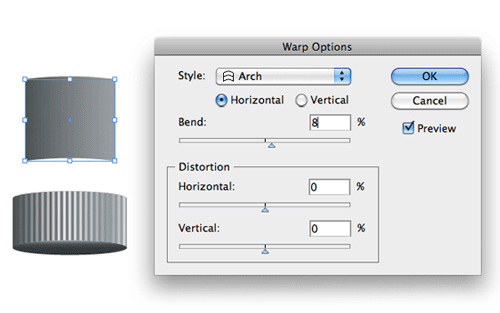
41. Next create a rectangle 55px wide and 50px in height and center horizontally to the art board. Go to Effect > Warp > Arc and give it a bend of 8% then click OK. This should do fine so now go to Object > Expand appearance and then drag it below the “lid” we created earlier. Now give it a linear gradient fill using colors: (76, 83, 84); (233, 233, 234), (153, 158, 163) and (218, 218, 218).

42. Copy this shape and Paste in Front four times. Then holding Alt/Cmnd drag the edges in slightly then release and do the same dragging up so you have a shape now thinner but taller than the original. Keeping it selected hold Shift and select the shape behind it. Alt/Cmnd click on Minus Front in the Pathfinder palette and then Expand. Change opacity to 33% and change Blend Mode to Screen.

43. Draw an ellipse roughly the same size as pictured and then move it to the left. Select the third copy you made of the section behind it and then in the Pathfinder select Minus Front. Set this new shape to an opacity of 40% and give it a Blend Mode of Multiply. Finally draw another ellipse similar to the one pictured, select it and the final copy of the main portion behind it the Alt/Cmnd click the Intersect button in the Pathfinder. Change this shape’s opacity and Blend mode to previous shadow you created by using the Eyedropper Tool (I).


44. Group all of these new shapes together, position them correctly and send them to the back.
Creating the Start/Stop Button
45. For the start/stop button we can simply make a copy of the piece we just did. Holding down Alt/Option, drag it to the left. Since it’s grouped together you’ll need to double click on it in order to edit what’s inside. First delete the ridges as we don’t need those. Then remove the bottom shadow and side highlights. Use the direct selection tool, draw a rectangle to select the bottom three points and the entire ellipse all together. While holding shift, nudge them all down about 3 times.


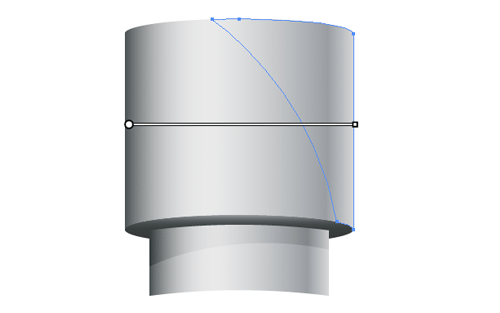
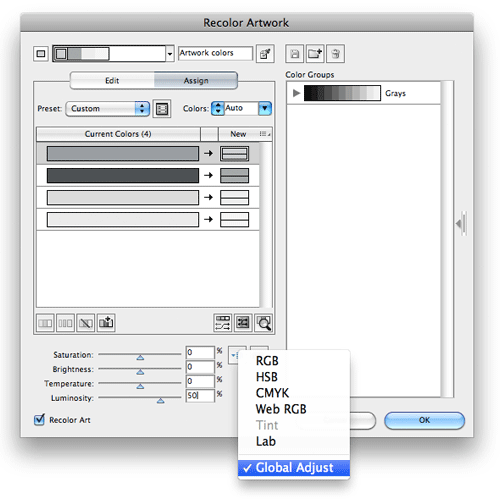
46. Select the top part of the start button and use the Eyedropper Tool (I)to match it’s gradient with the bottom section. Copy and paste in front. Now draw a curved as pictured using the Pen Tool (P). In the Pathfinder window make sure this new shape and the copy beneath it are selected then choose Minus Front. The gradient of the new shape will need to be adjusted so use the Gradient Tool (G) to drag it so that it is the same width as everything else. (xanax) Now go to Color Guide panel and click in the top right hand corner for the option Recolor Artwork. This opens up a new box and near the bottom select Global Adjust then make the Luminosity 50%. Click OK. Double click anywhere on the art board to exit Group Editing.
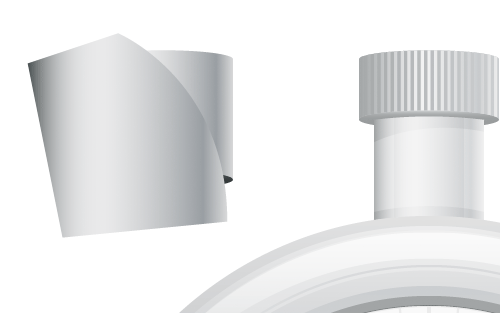

47. Select the button once more and then in the tool bar double click the Scale Tool. Make sure Uniform is the default and enter a value of 70% and hit OK.

48. Now when that’s done, simply rotate it about 40 degrees and position it.

Finishing Touches
49. For the last part of the the stopwatch, we need to just add that metal ring at the top. For this have the Ellipse Tool (L) selected and click on the art board–preferably away from the main design. When the dialogue box appears enter 140px for both values. With it still selected make an offset path of -22px and click OK. Select both circles and in the Pathfinder hit the Minus Front button. Fill with gradient using colors: (218, 218, 218), (153, 158, 163) and (76, 83 84) with an angle of -90. Make a copy and Paste it Behind, then double click on the Scale Tool. Enter the value 103% and hit OK. Select the front shape and give it a radial gradient with colors: (218, 218, 218), (153, 158, 163), (76, 83 84); (233, 233, 244); (129; 133; 138) and (218, 218, 218).

50. Keep it selected, copy and past in front twice. Then drag the front copy down so that the top intersects roughly with dark gradient in the middle. In the pathfinder, select Minus Front. Set the fill to white and then ungroup it by right clicking on it and selecting Ungroup. Set the top piece’s opacity to 65% and the bottom to 55%.

51. Repeat step 50 where you copied the original ring except this time drag up from the bottom. Minus front again changing the fill to a dark gray (102, 102, 102). They ungroup and set the top shape to 25% and the bottom to 45% opacity. Select all of the ring and group. Center it horizontally and drag it to the correct position.

52. Next we’re going to make a clipping mask. Do this by drawing a rectangle taller than the width of the ring but the same width as the piece the ring will go behind. Now draw an ellipse which is the same thickness as the ring and about 3 or 4px wide. Line the center of the ellipse to the the edge of the rectangle you just made. Duplicate and drag is to the opposite end. When it’s in position select both plus the rectangle you drew and then Minus Front in the pathfinder.

53. Draw a circle slightly larger than the ring and send it behind the shape you just created. One again go to pathfinder and select Minus front. This new shape is what you’ll use as a clipping mask. Select it and the ring behind it then hit Ctrl/Cmnd + 7 on the keyboard to clip it. For the final touches you can add a shadow by drawing an ellipse approximately the same width as the stopwatch. Set it’s fill to white then duplicate this shape, fill it with a gray of your liking and then from the Object menu choose Blend > Make. For a more better blend you can also select the outer ellipse using the Direct Selection Tool and set it’s transparency to 0.

To download the source file for this tutorial, you will need to login as a member.
Sign up today to access all exclusive members content!

finally, a good watch tutorial on positioning the seconds correctly. THANK YOU