
Follow this tutorial and learn how to draw a pizza in a box using Adobe Illustrator. The tutorial is composed of two main parts; creating pizza box and creating the pizza itself. We will start from some basic shapes and with a few building techniques that involve the Direct Selection Tool, the Align and the Pathfinder palette, Roughen and some simple effects. By the end of this tutorial, you will easily create the shapes that you need. Let’s begin!
Difficulty: Intermediate
Requirements: Adobe Illustrator
What will you get?
- Instant download of PDF e-book (55 pages, 44 steps)
- Comes with Ai file for easy reference
- Detailed step by step tutorial to draw a nice realistic pizza box
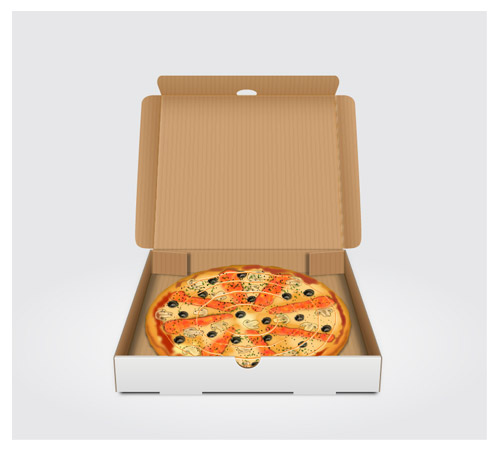
Tutorial Preview:
Create the Pizza
28. We are now down to the second-hald of our tutorial. Now it's time to create the pizza. Pick the Ellipse Tool (L) and create two ellipses with dimensions: 363 by 112px and 363 by 193px, then place them to the positions as shown in the second image. Fill the black ellipse with R=172, G=107, B=13 and remove its stroke. Next fill the remaining ellipse with R=239, G=136, B=45 and remove its stroke. Apply a 10px Feather effect for the resulting ellipse. Now reselect two ellipses created in this step and go to the Effect > Distort & Transform > Roughen. Follow the data below and click OK. Next select the smaller ellipse and make a copy (Ctrl +C, Ctrl +F). Then replace the existing color of the copy with R=242, G=165, B=56 and move the resulting ellipse 16px up.


29. At this point we are going to create the toppings of our pizza! One of which is the pizza’s bacon strips. To do this, pick the Pencil Tool (N) and create eight shapes (R=240, G=120, B=71) like you see in the image below. Reselect these newly created shapes and make a copy (Ctrl +C, Ctrl +F) of them. Next add a 1px stroke (R=205, G=21, B=21) for the copies and then remove the fill color of them. Finally apply the Width Profile 2 for the resulting objects and reduce their Opacity to 70%.


30. Select eight shapes created in the step 29 and copy them (Ctrl +C, Ctrl +F). Go to the Effect > Texture > Grain. Follow the data as shown below and click OK. Next apply a 4px Feather effect for the resulting shapes then set them to Blending Mode Overlay and reduce the Opacity to 80%.


31. Select a shape created in the step 29 and go to the Effect > Stylize > Drop Shadow.
Follow the data like you see in the image below and click OK. Repeat the process for the
rest. In the end the bacon strips should look like the image shown.

32. What’s a pizza without a cheese? So the second topping will be the cheeses! With the help of the Pencil Tool (N), create some objects like you see in the first and the second images. Once your objects are drawn, reselect them and fill them with R=252, G=209, B=130. Remove the stroke of these resulting shapes. Continue with the Pencil Tool (N) to create two object. Next fill the blue object with R=252, G=234, B=170 and fill the green object with R=255, G=252, B=161, then remove the stroke of these two newly created shapes. Finally select all shapes created in this step and apply a 9px Feather effect for them..


... end of preview. Sign up for premium membership to read the whole tutorial!

