This Illustrator tutorial go through some really basic and important Illustrator techniques while showing you how to create a fearsome lightning bolt from scratch. You will be using Roughen effect, tweak effect and much more to create the lightning effect.
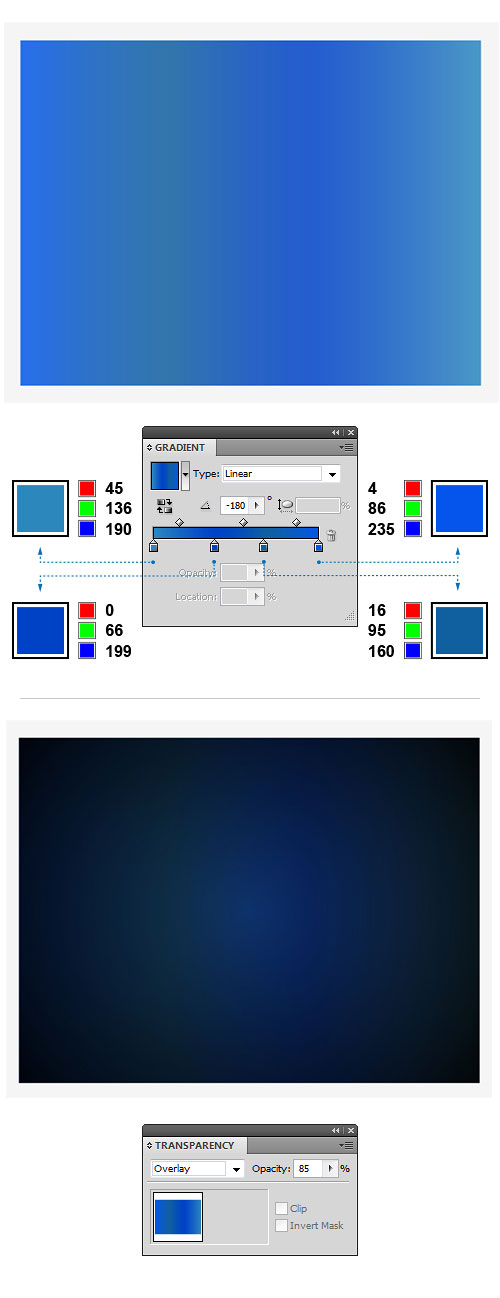
1. Create a blank document and set the Artboard dimensions to about 800 x 600px. Pick the Rectangle Tool (M) and create a rectangle with the same dimensions as the Artboard. Now, go to the Gradient Panel and fill the selected object with radial gradients as shown below: dark grey (R=77 G=77 B=77) and pure black (R=0 G=0 B=0).

2. Make a copy of the previous rectangle and paste it exactly over the top of the first rectangle. Open up the Gradient Panel again and fill the resulting shape with different shades of blue using four color stops: first stop (R=45 G=136 B=190), second stop (R=0 G=66 B=199), third stop (R=16 G=95 B=160), and fourth stop (R=4 G=86 B=235). Keep the object selected, and in the Transparency Panel set the Blending Mode to Overlay (Opacity 85%).

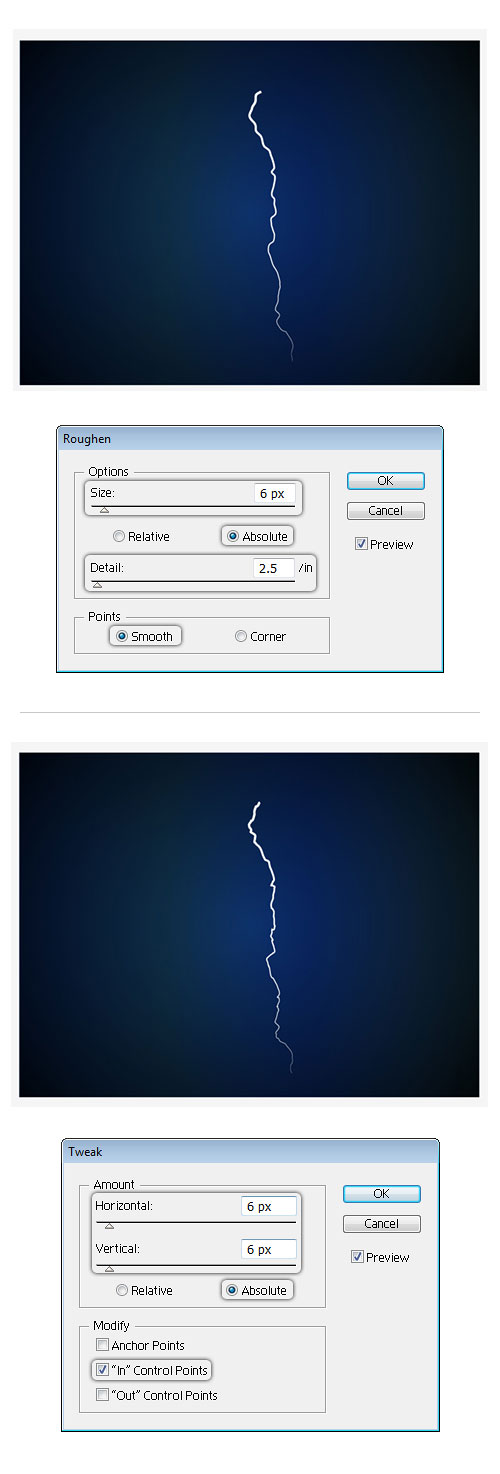
3. It’s time to create our first lightning strike. First, double-click on the Paintbrush Tool (B) in the Tools panel to bring up the brush options. Once done, reduce the Fidelity as much as possible to add more anchor points to the path. Check Keep Selected in the ‘Options’ section and hit OK. Now grab the Paintbrush Tool (B) and draw a vertical wiggly line as shown below. Keep the path selected, and in the Stroke Panel choose the ‘Width Profile 4’, to change the Variable Width Profile of the stroke. Go to the Color Panel and set the stroke color to white (R=255 G=255 B=255). In the Stroke Panel set the Stroke Weight to 4pt.

4. Make sure the path is still selected and go to Effect > Distort & Transform > Roughen… to open the dialog box. Once done, alter the settings to around 6 Size, 2.5 Detail, Absolute and Smooth and click OK. Then, go to Effect > Distort & Transform > Tweak… and the dialog box will appear. Enter the settings as follows: Horizontal 6px, Vertical 6px, Absolute and check “In” Control Points field and confirm with OK. Once done, activate the Graphic Styles Panel. Keep the main lightning strike selected and click on the New Graphic Style, in order to make a new style. When you’re done, double-click on the new style and rename it to ‘Main Lightning Strike’.

5. Take the Paintbrush Tool (B) from the Tools Panel and draw several open paths. Open up the Graphic Styles Panel now. To apply the style, keep all the paths selected and click on the Graphic Style icon. In the Stroke Panel select different stroke weights as indicated. Group (Ctrl+G) all the paths and go to Effect > Stylize > Outer Glow… to open the dialog box. Apply the values you can see on the image below and confirm with OK. We’re done with the main lightning strikes.
Note: Remember that all the paths are editable. If you are not satisfied with the results, you can modify the settings in the Appearance Panel at any time.

6. Let’s create some forks of lightning. Grab the Paintbrush Tool (B) and draw a path coming out of the vertical lightning strike. Keep the path selected, and in the Stroke Panel choose the ‘Width Profile 1’ from the Stroke Panel, in order to get narrow ends. Make sure the Stroke Weight is set to about 0.2pt. The stroke color should be set to pure white (R=255 G=255 B=255). Open up the Transparency Panel and lower opacity down to 50%.

7. Keep the path selected and go to Effect > Distort & Transform > Roughen… to open the dialog box. Once done, enter the following settings: 10 Size, 6 Detail, Absolute and Smooth and hit OK button. Then, go to Effect > Distort & Transform > Tweak… and apply the shown values: 6px Horizontal, 10px Vertical, Absolute and check “Out” Control Points field and confirm with OK. Open up the Graphic Styles Panel and click the New Graphic Style button to make a new style. Double-click the style and rename it to ‘Forks of Lightning’.

8. Select the Paintbrush Tool (B) from the Tools Panel and start drawing. You can draw as many paths as you want, creating fork-like lightning strikes. When you finish, select all the paths and apply our new style you can find in the Graphic Styles Panel. Using two or three different stroke weights will add some nice variety to the overall look. Once done, you should get something similar to the image below. Group (Ctrl+G) all and go to Effect > Stylize > Outer Glow… and apply the shown values.

9. The next step is to create a very bright lightning cloud. Pick the Ellipse Tool (L) and draw a perfect circle which dimensions should be set to about 140 x 140px. Open up the Gradient Panel and make sure you have a black to white radial gradient selected. In the Transparency Panel change the Blending Mode to Screen (Opacity 100%). Then, create a long thin ellipse with dimensions set to 300 x 65px and place it exactly above the previous one. Activate the Gradient Panel and fill the resulting shape with radial gradients shown below. When you’re done, set the Blending Mode to Color Dodge (Opacity 100%) in the Transparency Panel. Finally, create another ellipse and set the dimensions to 90 x 90px. Open up the Transparency Panel once more, and change the Blending Mode to Color Dodge (Opacity 100%). Place the ellipse over the other two objects we have created previously.

10. Grab the Ellipse Tool (L) and create a perfect circle (hold Shift to constrain the proportions). Set the dimensions of the object to about 150 x 150px and fill the resulting shape with radial gradients as shown below: light grey (R=177 G=177 B=177) and black (R=0 G=0 B=0). Open up the Transparency Panel and change the Blending Mode to Color Dodge (Opacity 100%). Make several copies and arrange the objects all over the lightning scene (refer to the image). That’s it. I hope you’ve enjoyed this tutorial.

View the list of all 101 Illustrator special effects tricks at 101 Illustrator Special Effects.


Not bad,not bad at all.