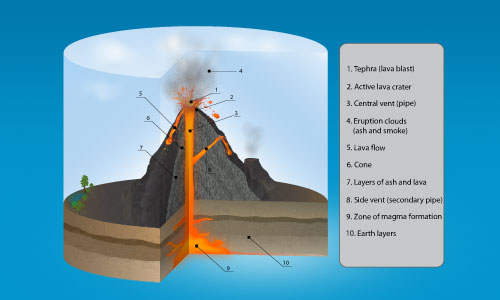

Learn how to draw 3d infographics in this new premium tutorial. I will explain how I made this 3D volcano infographics in illustrator. This tutorial will cover on how to do the cutaway illustration effect . You will also learn the techniques of using effects such as Texturizer, Mezzotint, Smudge Stick to create the texture effects. Hope you like it and find it interesting.
Requirements: Adobe Illustrator
What will you get?
- Instant download of PDF e-book (29 steps)
- Detailed step by step tutorial
- Learn the techniques to rock and earth textures
- Learn to create 3d infographics diagram from scratch
- Comes with Ai file for easy reference
Tutorial Preview:
13. Using the Pen Tool, draw a shape similar like the on below and add in some small shapes as ramifications, color them with (255, 125, 10) or other orange color that you like and then select Add to shape area or just group them all. Now, with the Mesh Tool make points inside the shapes and along the vent using different orange tones.

14. Copy and Paste in back this shape(the group) and apply Effect>Stylize>Outer Glow using the values shown below. Then Copy and Paste in front the shape again and apply Effects>Distort>Diffuse Glow setting the values from the image, then lower the Opacity to 25% and set mode to Multiply.

15. Now the image should look like the one below. The secondary vent was made using the same method.

16. I noticed that some of the brushes that comes along with Illustrator(Window>Brush Libraries) are very appropriate for the lava eruption and I decide to use those. Below shows some of the brushes that I will be using in this tutorial.
To make the lava eruption, I used some of those brushes in different sizes. First, draw a curve line and apply the brush effect. Then go to Object>Expand Apperance to expand it so that you can fill them with orange color. Then use the Mesh Tool and start making points just like what you did for the central vent. Try applying different orange, yellow and red tones for the mesh.

17. At this point, the image should look like the one below. All the brushes that I have used are from the Library and shown in the image above.

... end of preview. Sign up for premium membership to read the whole tutorial!


Trying to download this tutorial and it keeps taking me in circles to the preview version. Where do I download the premium version?
We are LogoProDesign as a Creative Logo Designer, We checked your artwork collections. Those are amazed us. Thanks for that type of good work collections. We regularly checked your website for good artwork example.
It is extremely helpful for me since I am a science student and going the graphical work on the earths interior.Amazing post and everyone will submit their mature views regarding this article.
so many nice things in a one place.that’s the perfect idea of this site.You are highly appreciated to get more similar tutorials! many thanks and keep up the good work!
This is a really good tutorial, I would recommend this to my friends as well. Thanks