![]()
In this tutorial, we will continue the series of the best Olympic logos walkthrough. Today, we will recreate the emblem of Olympic Games in Lillehammer of 1994. This nice and simple-looking design requires some creativity as well as knowledge of basic Adobe Illustrator features. Let’s get started!
Creating the Background
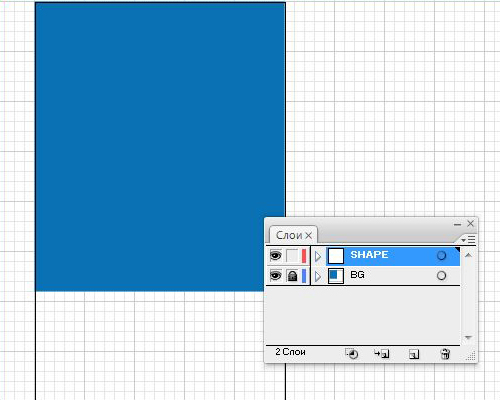
1. Open Illustrator (I use CS3 version) and create a new document 500 px wide and 800 px high. Make it RGB color mode. Now, create a rectangle 500×600 px – it will be our background. (50gram) Fill it with blue color (I chose to use light blue). Lock this layer and name it “BG”. Create new layer named “Shape”.
Creating a Curve
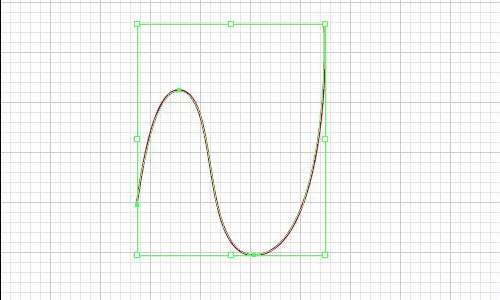
2. On the newly created layer grab a Pen tool (P) and create a curve like in the screenshot below. Make it no fill and whatever stroke. Turn off the BG layer visibility off for now. Your curve has to consist of 4 corner points – in the beginning, in the end, and two points in every extrema – it is very important!
Cutting the Curve
3. Now take a Scissors tool (C) and cut the curve in two points so that you end up with 3 separate open paths. Don’t move the parts, they need to remain together.

Duplicating It
4. Select the entire curve consisting of 3 separate paths and move it to the right holding down both Shift and Alt keys. This will make a copy and align it with original curve. Now, select the upper-right point of duplicate with Direct selection (A) and move it a bit to the right so that the shape is little wider in this area.

Joining Open Points
5. Probably most of you have guessed that we need to end up with 3 closed shapes. To do it we have to join every pair of curves. First, select the upper-right pair of endpoints with Direct Selection Tool (A) and press Ctrl+J to join them, choose “corner” for the join settings. Do the same now for the bottom-left pair of points – see the image for reference. You’ll have them joined with straight horizontal lines.

Creating 3 Closed Paths
6. We still need to close other pairs of points. To do it easily, I recommend you to select the right figure and hit Ctrl+J – the shape will be closed. Do the same with the left one.
Just select the pair of points you want to be joined and hit Ctrl+J, and do the same with the second pair. Now, you have 3 separate closed paths – I offset them a bit just to show the idea.

Organizing the Shapes
7. Now, make sure you did everything properly – try to fill all three shapes with different fill colors. They have to be separate closed paths. Now, you have to send the left part to back (Shift+Ctrl+D) and the right one to front (Shift+Ctrl+]) to have something similar to image below.

Making Patterns
8. The shape has to be filled with two patterns, so let’s create them. Just draw a small rectangle, fill it with white (change the stroke to none!). Now, copy and paste in front (Ctrl+C and Ctrl+F) and reduce the height of copy to about one-third of original. Fill it with blue color you used for background. Select both rectangles and drag it to the swatches panel.

9. Now, change the fill of bigger rectangle to blue and the smaller one to white, and drag it to swatches panel. Don’t forget to choose the blue color that is used for background.

Applying Patterns
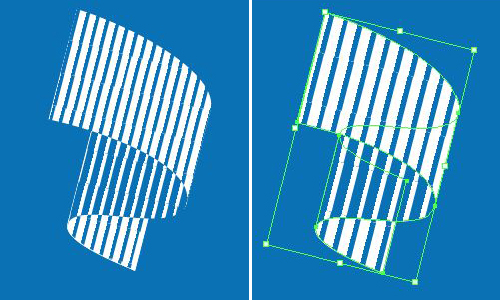
10. Now select every shape and apply the appropriate pattern fill for each of them. Change the stroke to none. Use the image below for reference.

Positioning the Shape
11. Okay, the shape is almost ready. Select all three parts and group them (Ctrl+G), and rotate it to get something similar to the image below. To make sure the patterns are transformed along with object, go to the flyout menu of Transform panel and check “transform all” option. Once I positioned the shape, I thought the pattern is too small – in this case select the Scale tool (S), hit Enter and check “pattern” while unckecking “object”. I decided to scale the pattern up to 200%. Unhide the bottom layer to see the background.
Drawing the Ice
12. Once you’re satisfied with shape, lock the layer and create a new one named “Snow”. To create the icy surface, take a Pen tool (P) and draw the irregular shape with diagonal upper part. Make it little wider than blue rectangle, and fill it with white with no stroke.

Applying Effect
13. With shape selected, go to Effects>Distort & Transform – Roughen, and enter 3 for effect and 10 for details. Check corner points and click OK. You’ll have the result as in the image below.

Creating a Symbol
14. To make the snow, it’s better to create a symbol. Create a small white circle and drag it to Symbols panel. Check “graphic” option in symbol settings. You can delete the circle now.

Spraying Symbols
15. Now, grab a Symbol sprayer tool (Shift+S) and spray white circles along the border of icy surface. I’d recommend you also resize and move some symbols if you want with appropriate tools of “Symbolism” group (to make symbols smaller, press Alt while applying Symbol Sizer).

Making Snow
16. To turn circles into snow, select the group of symbols and apply Roughen effect again, this time with 20 for effect and 20 for details. Choose corner points, of course. You can adjust settings to your liking, however.

Creating Olympic Rings
17. Now you can lock the Snow layer and create a new one. All you have to do now is draw 5 Olympic rings (100×100 px each) and position them properly. Change their fill color to none and stroke color to blue, yellow, black, green, and red. We won’t exactly repeat the overlapping rings. But if you wonder how to recreate the overlapping effect, I will tell you in following tutorials of the Olympic series.

Adding Text
18. To finalize the composition, add a text Lillehammer ’94” with serif black font. That is the final effect.

Conclusion
Today we recreated a nice piece of design – the Lillehammer’94 Olympic emblem. With help of patterns, effects, and some patience it was rather simple and fun. We’ll continue observing the best Olympic logos of all times in the next tutorial.
To download the source file for this tutorial, you will need to login as a member.
Sign up today to access all exclusive members content!

Great tutorial…
nice tutorial!!!!
Спасибо за урок)
Случайно обратила внимание на слово “Образцы”, так что по-русски, от всей души @}->–
thanks a lot for your tutorial & It’s very nicely & easy.
Great tutorial!
Exellent Tuturial
Very Nice! Exellent tuturial
Very Nice! Exellent