With 3D Live Effects you can add dimension to your 2D drawings easily. Though the features are limited, you can still control the appearance of 3D objects with lighting, shading, rotation, and more. You can also easily map artwork onto the 3d surfaces. Let’s see how each 3D effects works…
3D Extrude & Bevel
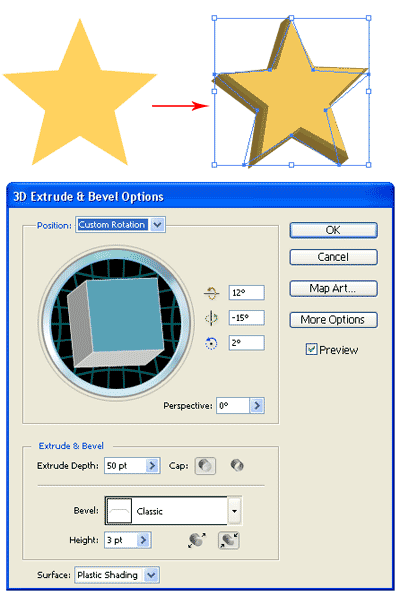
3D Extrude adds depth to an object to make it 3D. Select your object and go Effect>3D>Extrude & Bevel. The options window pops up. Change the Extrude Depth to determine the amount of depth. (simonsezit) The Bevel sets the type of edges for the 3D object. Click and drag the cube to define how the star rotate in 3d space. You can also change the surface shading to define the texture.

3D Revolve
3D Revolve effect adds depth to an object by revolving an axis. In the illustration below, I have drawn half of the bottle. The 3D Revolve will make it revolve from the leftmost axis at 360degrees to form a 3D bottle. To revolve an object go to Effect>3D>Revolve.

To read the whole article, you will need to login as a member.
Sign up today to access all exclusive members content!

Next Lesson: Distort using Warp Effects »
Back to Illustrator Training Course
Amazing tutorial, I so enjoyed this one, and now I am so looking forward to experimenting more with it. Here is how my lesson turned out
http://i79.photobucket.com/albums/j144/chellesky62/Illustrator%20Classwork/revolvedbottle_csky.jpg
Hi ArtConch, Gd work and thanks for sharing.
I didn’t get the Mapping Artwork thing. When I tryied to apply it, it did a revolve and not the example you gave. Could you explain me a little better so I may find what i miss? Thanks.