
Liquify Tools can add some wacky distortion to your photos or shapes easily using different distortion effects. Though it is not popular but we will still take a look at how it works.
Liquify Tools
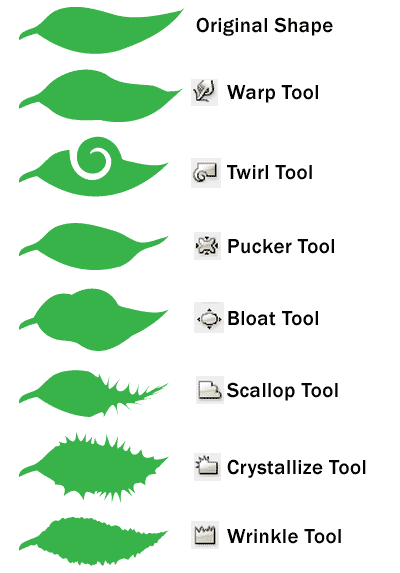
You can have some wacky distortion using the Liquify Tools. Here is the list of liquify tools.

Here I have a leaf with different warp effects applied. Though I find the uses for warp is quite limited. However, if you put some creative to it, you can find an interesting use for it. See my wood grain tutorial to see how I use Warp Tool to create wood grain effect.
Drawing a Graph
Sometimes you may have to chart data. Illustrator has some quick tools for drawing different type of charts and graphs to make your presentation stand out from the crowd. You can draw pie charts, line graphs, bar graphs and more.

Select the Bar Graph Tool and click and drag an area on the artboard. The table data will appear. Fill in the x-axis and y-axis with your table values. Once confirmed, click the tick to create your graph. You can also leave out the word labels if you don’t need it.

Once you have confirmed the data, it will generate a greyscale graph. You can then use Direct Selection Tool to select the shapes and change the color.

Conclusion
There are more things you can do to make your chart stand out. Some common techniques are applying 3D Extrude to pie or graph charts to make it 3D. Other than this, you can replace the bring grey bars with graphics. See how to do this in this tutorial.
Next Lesson: Applying Live Paint »
Back to Illustrator Training Course
How to easily change the size of the “brush” when using warp tools, and even when using brush. I know that one way is to double click on the tool and in case of brush you can adjust the stroke, but what about other possibilities? Are there any keyboard shortcuts?
ps. nice tutorials, I follow them from the beginning 🙂
Hi Lolka, with the warp tool selected, hold Alt/Option to resize it. Hold shift to constrain proportions. Hope it helps.
works! real thanks! probably more convenient than in PS 😉 I understand that in case of brush it is a lot different story, because we actually dont draw/paint but place a path.
That’s why I don’t understand what is the difference between Paintbrush and Pencil. In my opinion there is no difference at all 😉
Great tutorial man, rasta love
Great tip about the holding “Alt”key to change the + or – of the tools (eg. warp tool) without need to click on the tools pannel 2x to oppen the options pop-up. Nice!
Cheers,