
This Illustrator tutorial will teach you how to create a plate of yummy Japanese sushi in Adobe Illustrator. Sounds like a lot of work, but I will show you how to make the details like the rice, the spawn and the sesame seeds easily just using Symbols. This technique will speed up the process of your work. Hope you enjoy this sushi tutorial.
Drawing the Sushi Plate
1. Open a new web document. Take the Pen Tool and draw the shape below. The color I used is (255,235,138). Next Copy and Paste in back this shape and use the Down Arrow key from the keyboard to move it down a bit. Do this again and move the third shape lower then the second one. Color for the second shape is (255,217,97) and for the third shape (231,177,0).


2. For the shadow, copy the plate again and move it down and to the right, fill it with 80% black. Add a 7,2 px Gaussian Blur and lower the opacity to 50%. Here is the final plate:

Drawing the Soy Sauce Bowl
3. Take the Ellipse Tool and draw 2 oval shapes like in the image below. The bigger oval from the back is filled with a linear gradient from light gray (13%) to white and the smaller oval is filled just with a very light gray (4%). Next take the Pen Tool and draw the third shape you see below or copy the bigger oval two times, place them one a bit lower then the other and use from the Pathfinder Panel- Subtract from Shape Area to obtain the same shape.
Position the shape to its place and with the Pen Tool draw also the bottom shape of the bowl. Gradients used are similar to the ones above, just change the gray tones a bit.


4. First, draw one more oval and fill it with brown (102,71,70) to make the soy sauce. Now,we will add some highlights to the bowl. Draw a random shape on the bowl and fill it with white, add a 4 px Feather Radius and reduce the opacity. Do the same on top of the soy sauce with different brown tones.

5. To make the shadow, select the 3 shapes that you see below, copy and group them. Next, fill them with 80 % black, then add a 8 px Gaussian Blur and lower the opacity.

Drawing the Chopsticks
6. To make the sticks I used the Rounded Rectangle Tool and then with the Direct Selection Tool I selected just the points from the left and moved them closer to each other to obtain the tip of the stick. The fill color is (223,186,128). Next draw a black rectangle, copy in front the stick, select both and use Intersect Shape Area and Expand to make the black shape on top. Do the same to make the red and the green shapes or other design elements that you want.

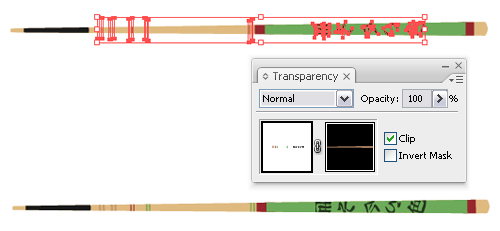
7. To make the chopsticks more attractive I added more decorations. Draw some stripes and add some Japanese characters on the right and then group them all. We will need to mask the deocrations to the chopstick. Copy the chopstick, select the group we just made, then double click in the Transparency Panel at the black square you see below. Now paste the stick shape, then exit the mask mode and the final stick is done.
Drawing the Nori Seaweed
8. Use the Pen Tool and draw the shape below. Give the top shape a black stroke and fill the second one with 90% black.

9. To create the texture, Copy and Paste in Front the second shape and fill it with (128,128,117). Now go to Effects>Artistic>Rough Pastels and apply the settings below. Set the mode to Overlay and lower the opacity to 55%.

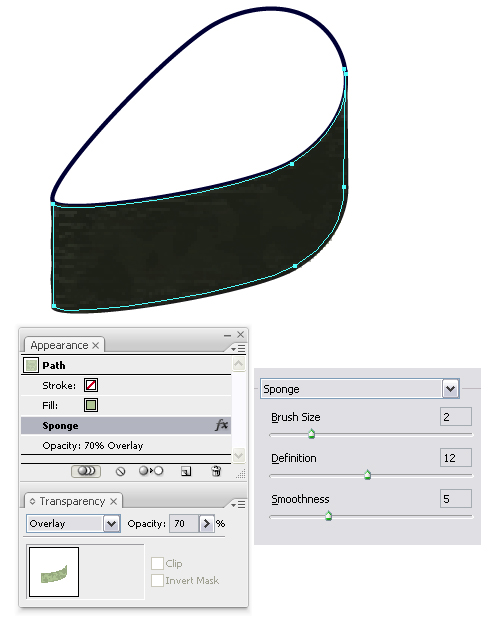
10. Paste in Front again the same shape, fill it with (174,196,148), go to Effects>Artistic>Sponge and set the values below. Change the mode to Overlay and reduce the opacity to 70%. This will create the seaweed texture.
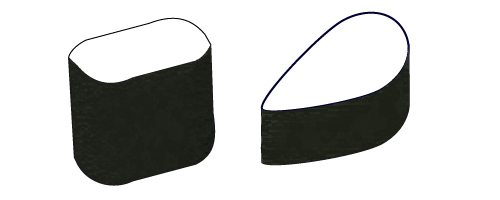
11. Here is the final nori seaweed shape for the sushi. Do the same and make more shapes.
12. We will begin to draw the sushi rice. Draw 3 different oval shapes and fill them with linear and radial gradients using white and light gray tones. Then add small white shapes on top of each one for some highlights. Once the rice will be small and crowded it will make all the difference.

Drawing the Sushi Toppings
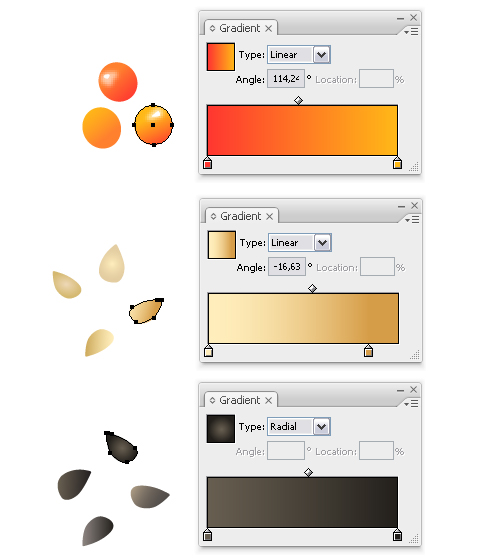
13. We will being to draw the spawns. Draw 3 circles with the Ellipse Tool and fill them with linear gradients using orange tones. Add on top 2 small shapes as highlights, one with 1 px Gaussian Blur and 60% opacity and one just filled with white for some glow. Group them and drag them to the Symbols Panel. Colors I used for one of them are: (255,54,48) and (255,184,23). They look big now but they are the tiny ones in the final image.
Draw with the Pen Tool similar shapes to the ones below and fill them with linear and radial gradients. For the white sesame colors for one of them are: (255,238,188), (214,157,72) and for the black sesame: (103,94,80), (34,31,27). Group them and drag them also to the Symbols Panel.
14. For the big spawns, use the same method as above. And we are done with this part.

Drawing the Fish Egg Sushi
15. Using one of the nori seaweed shapes we made earlier, start spraying inside the shape using the big spawn symbol from above. I prefer to spray smaller groups, adjust them and place them where I want. Also copy the top shape, remove the black stroke, fill it with yellow and send it behind the spawn. This will cover the possible empty spaces between them. Do the same and make the second one in the image.

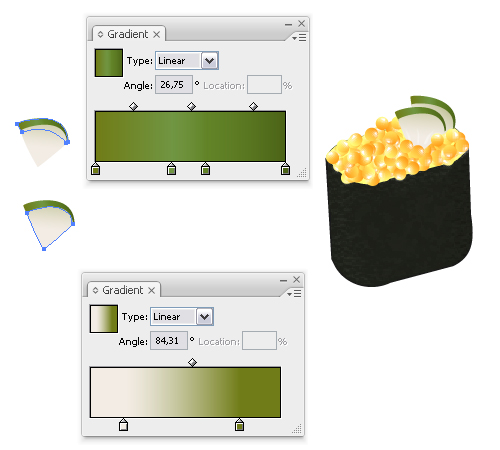
16. To make the cucumber slices, draw with the Pen Tool the 2 shapes for the flesh and the skin. Color the green part with a linear gradient using: (112,124,23), (112,149,66), (98,131,39), (75,99,23) and for the white part: (242,236,228) and (112,124,23). Send the green part behind the white one. Make the second cucumber slice, place them on top and also add some spawn in front of them. We are done with the first 2 sushi pieces.
Drawing the Tuna Sushi
17. Start spraying using the rice symbol we made earlier. To draw the tuna, draw a random shape and fill it with a linear gradient using: (170,101,75) and (155,58,41). Copy and Paste in front this shape, color with (155,58,41), go to Effects>Sketch>Note Paper and set the values from the image, then set to Soft Light and lower the opacity to 45%. This choice may seem strange but is the only effect that made the texture similar to the one I had in mind.

18. For the cucumber pieces, draw 2 shapes like in the image below. Colors from the gradient are: (206,255,174), (154,176,89) and (82,128,80). Then draw 2 more shapes behind the first two and color them with green (0,128,69). I also added some tiny shapes on top. We are done with the second type of sushi.

Drawing the Salmon Sushi
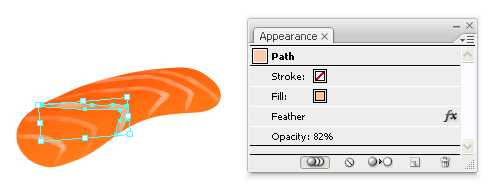
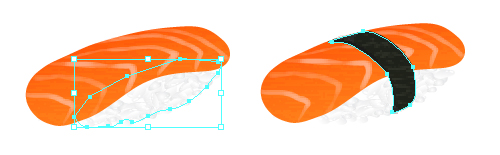
19. Start by drawing the shape below and fill it with a linear gradient using orange tones. I used: (255,128,27) and (255,71,0). Now draw random v shapes on top and fill them with (255,188,158). Add a 2 px Feather and lower the Opacity for each one as needed.
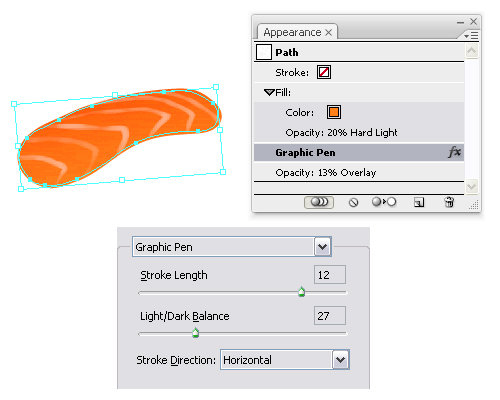
20. To add more texture, Copy and Paste in Front the first shape and fill it with orange. Set the mode to Hard Light and reduce the opacity to 20%. Now, go to Effects>Sketch>Graphic Pen and set the values in the image. Change the mode to Overlay and the Opacity to 13%.
21 Now spray using the rice symbol behind the salmon and also draw a shape like below. Send it behind the rice and fill it with white to cover the possible empty spaces. Draw a seaweed to wrap up the sushi. Use the techniques in the previous steps where I explain how to make the seaweed texture.
Drawing the Square Sushi
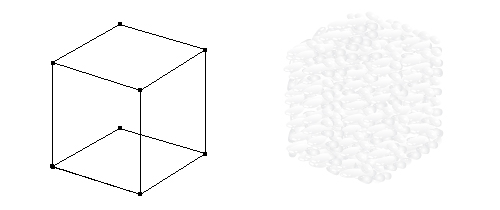
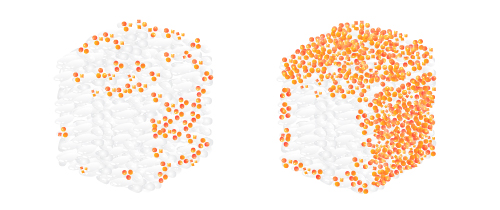
22. Draw the cubic structure like below to help spraying the rice easier. Next start spraying using the tiny spawn we made at the begining. Adjust the symbol groups until you get what you want. The result should look like in the next image:
23. Next, draw a random shape and fill it with a linear gradient using different green tones and place it in the middle. Now, draw another shape and follow the steps above to make the salmon piece on top. For more color I added 3 more shapes behind the salmon. Also, place some rice on top of this shape to make the sushi look more realistic.

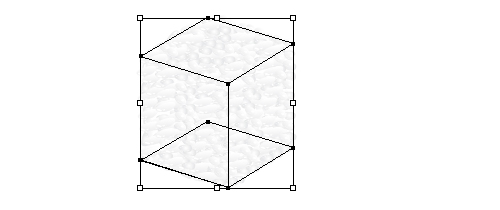
24. Start again using the cubic structure and spray the rice symbol all around.
25. Draw a shape and fill it with a linear gradient using yellow tones. On top of this shape, draw 4 smaller shapes like in the image below. For two of them, I use the gradients that you see in the image to obtain pieces similar to carrot and avocado. You can use anything that you like best.

26. On top of the rice, start spraying the black sesame seeds symbol we made and adjust them if needed. Also place again some rice on top of the carrot and avocado pieces inside to look more natural.

27. Using the sushi I explained above as examples, you can make many other types of sushi according to your imagination. I made two more, one using also the white sesame seeds we made at the begining as you can see in the image above.
Step 16. Making some decorative work
28. Draw with the Pen Tool some shapes like in the next image and group them. Next draw some black lines on top and group them also. For the mask, copy the green group, select the lines, double click the black square in the Transparency Panel and paste the group. Make a copy of the result and arrange the decorations on the plate like in the final image. Also, I added some shadows according to the positions of the sushi on the plate.

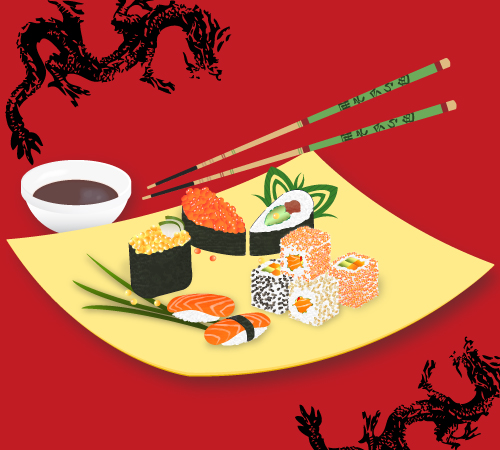
Final Artwork
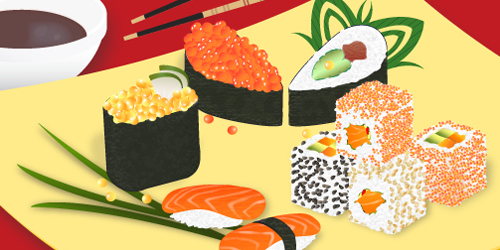
29. The work is done. Hope you find it interesting and useful. Here is my final image:
To download the source file for this tutorial, you will need to login as a member.
Sign up today to access all exclusive members content!

Thanks for sharing, this really cool stuff. Love it. Keep it up.
really nice tutorial .. 🙂
That’s very cool. I use a lot of vector work for my illustrations, but this takes a whole lot of patience. 🙂
really good post thanks for the vectors
realy nice stuff, cheers for sharing this.
Really amazing article! I really like it because it is one hell of good piece! I will be happy to find more from your published papers in the near future on the Carpet Cleaning same topic. I did search for two hours and I did not found what I was searching for.An article that is so perfectly and fully written like yours is.